
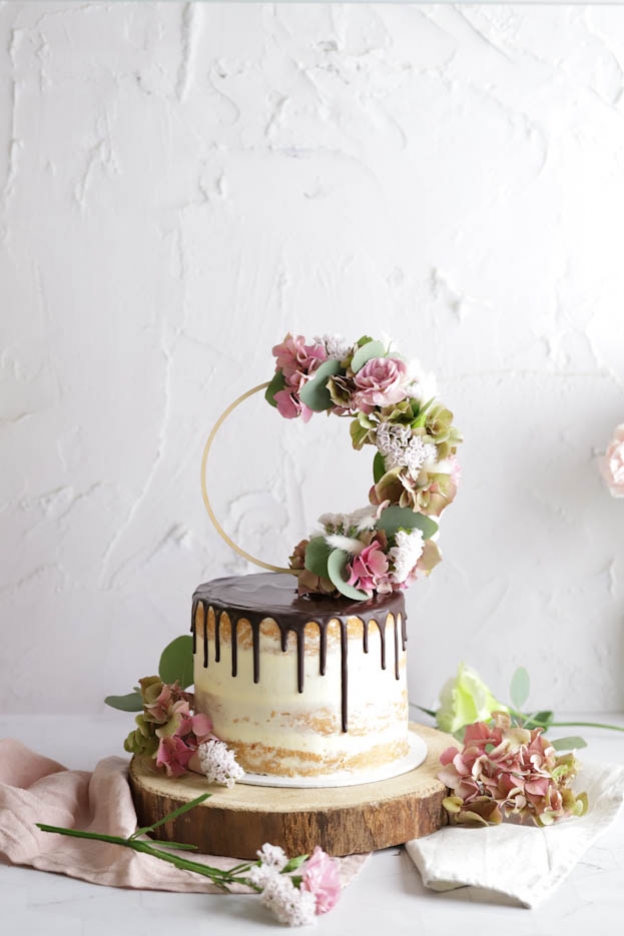
Dripcake with Nutella
PDF Recipe :o)
Hello food lovers!
Today, I show you how to make a naked cake filled with Nutella with a beautiful chocolate drip.
But what is a drip? The word drip means "drop" in English, but more concretely these are tall cakes on which you pour a glaze/coating.
These drip cakes are very trendy right now and with a few tips, you'll see that this one is very easy to make! :o)

For a cake with a diameter of 15 cm and a height of approximately 12 to 15 cm, you will need:
Sponge Cake
- 6 eggs
- 150gr sugar
- 150gr flour
- 1 tsp vanilla extract
Swiss Meringue Buttercream
- 150gr egg whites
- 300gr sugar
- 1 pinch of salt
- 250gr soft butter
Nutella Cream
- 100gr Nutella
- 100gr cream
- 400gr cream
- 2 tbsp whipped cream stabilizer
- 2 tbsp unsweetened cocoa powder
- 1 tsp vanilla extract
Decoration
1 bottle of chocolate for dripcake
Sponge Cake
I recommend preparing the sponge cake and the Swiss meringue buttercream 1 to 2 days in advance.
For this recipe, I made my favorite sponge cake that I use for all my tall cakes.
You will find the recipe here: Sponge Cake


Swiss Meringue Buttercream
In Cake Design, we work a lot with buttercreams or ganaches, as they form a protective layer for the fondant and thanks to their solid and compact structure, you get a beautiful straight cake.
There are many kinds of buttercreams, I have tested many and I must say that this cream is much less sweet than the others.
Many people also use this cream as a filling, but I am not a fan of cakes entirely filled with buttercream, I find it too heavy.
To make the Swiss meringue buttercream, cut 250gr of butter into small pieces so it softens more easily. Set aside.
Pour 150gr of egg whites, 300gr of sugar and a pinch of salt into a saucepan.


Heat everything to 70°C while stirring constantly.
I used my 2-in-1 whisk thermometer for this, which is very handy as it has a built-in thermometer.
It is important to stir the mixture constantly so that the egg whites do not burn at the bottom of the pan and do not cook.
It is also possible to heat the mixture in a double boiler to prevent anything from burning.


When the temperature reaches 70°C, pour the mixture into a very clean bowl (free of any fat) and beat it at high speed until you obtain a meringue.
The mixture must be firm and no longer warm, this can take up to 10 minutes.


Then reduce the speed and gradually add the 250gr of soft butter previously cut into pieces.
When all the butter is in the bowl, you can increase the speed again.
This is the moment when you might think you have ruined your buttercream, but that is not the case at all. It is completely normal for it to separate or curdle. ;o)


Whip the cream until it becomes beautiful and smooth. ;o) See the second photo below.
Put the buttercream in a container and cover it with cling film.
If you prepare the buttercream a day in advance, you can leave it in the kitchen, well wrapped, during cold seasons.
On warmer days, store it in the fridge and take it out on the day of use approximately 3 hours before to let it soften.
The buttercream keeps for 4 days in the refrigerator and can be frozen without any problem for up to 3 months.


Nutella Cream
To start, heat 100gr of Nutella and approximately 50gr of cream (from the 100gr) in the microwave at 600Watt for about 30 seconds.


The mixture should now be warm and softer. Pour in the remaining 50gr of cold cream and mix with a spatula.


Then pour 400gr of cream into a bowl and start whipping the cream.
When your whisk starts to leave traces in the cream, you can add, using measuring spoons, 2 tbsp of whipped cream stabilizer and 2 tbsp of unsweetened cocoa powder.
The whipped cream stabilizer is a powder that makes the cream firmer for decorations.
The cream thus becomes firm and stable enough to be piped more easily.


Finally, add 1 tsp of vanilla extract and the Nutella/cream mixture. And there you go, the cream is ready. :o)


Fill a 30 cm piping bag with Nutella cream. To make it easier, use a jug.
Keep the cream in the fridge until ready to use.


Filling and Decoration
All that's left is to fill and decorate the cake. :o)
To do this, also fill a piping bag with buttercream and cut the sponge cake into 4 equal layers using a cake leveler.
My sponge cake is 10 cm tall, which is why I set the leveler to 2.5 cm so that all the layers of the sponge cake are the same thickness. The leveler is very simple to use. Just saw through your cake, keeping the leveler's feet firmly on your work surface.


Place the first sponge cake disc on a thick board or a thin board and place it on a turntable. The turntable is essential for me — without it, it will be really difficult to achieve a nice smooth finish later.
Start by piping a thin border with the buttercream, then pipe the Nutella cream in the center.


After that, place a second disc and repeat the process.
Continue doing this until the cake is completely filled.


Finally, place the last sponge layer on top and press lightly on it with your hand. This will help to level the cake a little if it is not perfectly straight.
I always use the bottom of the sponge cake for the top finish, as it is the flattest.


Using a small offset spatula, lightly spread the remaining buttercream over the cake.
Don't put too much on — that's the principle of the naked cake, which literally means "bare cake" in English. The whole point is that the sponge is still visible. :o)


Then lightly smooth the excess buttercream using a cake scraper. Always stay perfectly parallel to the cake to get a nice straight finish. It's a skill that takes a little practice! ;o)


A small ridge forms on the top of the cake, you can carefully remove it with the small offset spatula.
For me, what works best is when I hold the spatula straight and smooth the edge from the outside inward.
Place the cake in the fridge for at least one hour. When the cake is well chilled, it is much easier to control the flow of the drip.
Once the cake is well chilled, it's time to drip! ;o)
For the drip, I used the ready-to-use drip cake chocolate from Funcakes. It is available in many colors and is very easy to use.


To prepare the drip, proceed as follows:
- Remove the cap and place the bottle in the microwave in 20 second intervals at 600Watt.
- Check whether the chocolate is already sufficiently melted by squeezing the bottle in your hands.
- After heating 2-3 times, the chocolate should be sufficiently melted in the bottle. Replace the cap on the bottle and shake it.
- Measure the temperature using a thermometer. For the chocolate drip, the temperature should be 28-30°C so that it flows perfectly.
- Check on a paper towel that the drip flows correctly before applying it to the cake.
Depending on the color, the drip may be more liquid or firmer, so you may need to adjust the temperature accordingly.
Here is a video to show you the dripping technique.
You will see that the more you press on the bottle, the lower the drip flows, and vice versa.
The drip can also be used on fondant and ganache-covered cakes.
And there you go, the cake is ready :o)
You can decorate the drip cake in many different ways, whether with sweets, chocolate, donuts, macarons, etc...
Here we opted for flowers and gave our round cake topper to our trusted florist, Manon des Fleurs in Farvagny. Look at what she did with it, it's absolutely beautiful! :o)
The cake keeps for 2 days in the fridge.
I hope you enjoyed this recipe! :o)
Wishing you a lovely Sunday, food lovers.
Jenny
P.S.: All the materials used can be found at the bottom of the recipe.


Related posts
 Juicy Matcha Muffins with Pecan Nuts & White Chocolate
Matcha Iced Latte & Coconut Variant
Pull-apart bread with fresh wild garlic pesto
Mini Banana Bread with Chocolate Chips
Juicy Matcha Muffins with Pecan Nuts & White Chocolate
Matcha Iced Latte & Coconut Variant
Pull-apart bread with fresh wild garlic pesto
Mini Banana Bread with Chocolate Chips
Leave a comment
Comments
Question de Moira
By: Moira P. On 2024-11-09Bonjour, est-ce que je peux recouvrir le gâteau de pâte à sucre? Sans le drip logiquement ?
Et si je n’utilise pas de stabilisateur c’est grave?
Replied by: Karin On 2024-11-11
Question de Stefania
By: Stefania M. On 2023-08-25Bonjour,
J’ai deux questions:
1. A combien de g correspondent 2 càs de stabilisateur à crème fouettées?
2. Dans la recette, après le stabilisateur à crème fouettées, nous devons verser 1,5 càs de poudre de cacao. Mais il est écrit que nous devons en avoir 2,5 càs. Du coup, que devons-nous faire de la différence?
Merci bien!
Replied by: Karin On 2023-08-25
Replied by: Stefania M. On 2025-01-24
Question de Sabrina
By: Sabrina S. On 2023-05-07Bonjour,
j'aimerais réaliser un dripcake à la fraise mais avec un vrai coulis de fraise et non un glaçage miroir.
Avez-vous une idée de la proportion de gélatine pour que les coulures aient une belle consistance?
Si oui, merci d'avance.
Si non, je ferai des expériences :-)
Sabrina
Replied by: Karin On 2023-05-08
Question de Marie-José
By: Marie-José P. On 2023-05-04Bonjour,
Est-ce que une fois le drip coulé et décoration en place je peux mettre 1 nuit au frigo ?
Replied by: Laura On 2023-05-05
Question de Tanya
By: Tanya S. On 2023-03-05Bonjour,
Es qu'il est possible de remplacer la Nutella par la pâte à tartiné Caotina ? ou alors des simple pistole de chocolat ? Es que c'est possible d'accompagné ce gâteau par des fruits rouge en décoration sur le dessus et dans les étages du gâteau ? ou ça fait trop ? sachant que je fais une crème au beurre rose et à l'arome de framboise pour des décorations rose sur le dessus du gâteau.
Replied by: Laura On 2023-03-06
Question de Florence
By: Florence J. On 2022-12-28Bonjour,
Merci pour cette recette !
Peut on faire ce gâteau la veille ?
Merci pour la réponse
Replied by: Laura On 2022-12-29
Question de Marisa
By: Marisa G. On 2022-11-21Bonjour , je peux savoir pour pour combien de personnes le gâteau …. On aimerai le faire lundi prochain mais j’ai que des enfants à table du coup faut pas un troooooop gros
Replied by: Karin On 2022-11-21
Replied by: Karin On 2022-11-21
Replied by: Marisa G. On 2022-11-21
Replied by: Marisa G. On 2022-11-28
Replied by: Marisa G. On 2022-11-28