
Teacher gift
Hello foodies,
Your children are gently reaching the end of their school year and you are looking for a gift idea for their teachers?
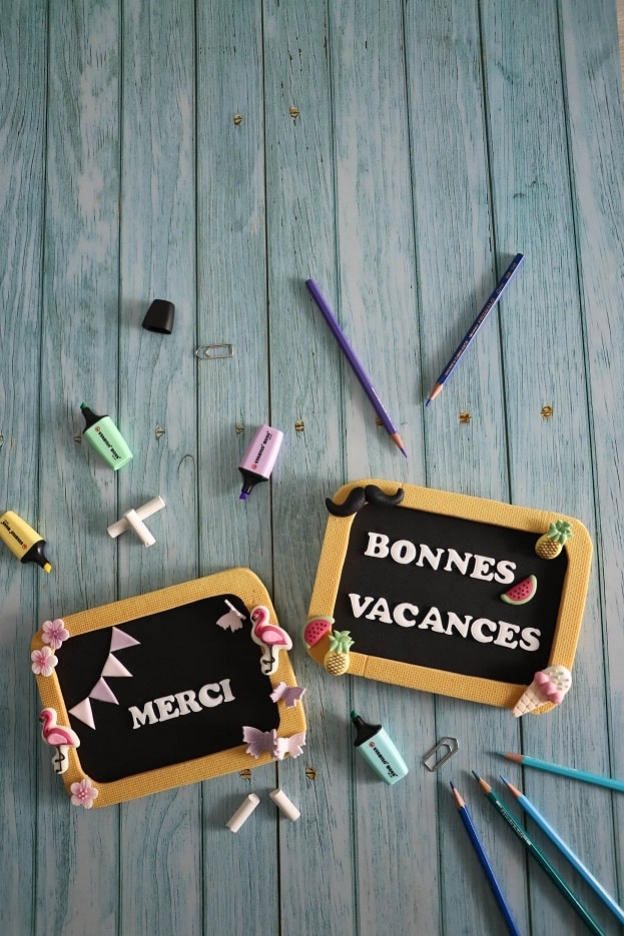
We have just what you need: a decorated slate-shaped biscuit. A fun activity, whatever the age of your children.
You'll see, they're going to love it! ;-)

For 1 slate you will need:
Biscuit
- 125gr butter
- 75gr icing sugar
- 1 tsp vanilla extract
- 1/2 egg
- 1 pinch of salt
- 225gr flour
Decoration
- 1 pack of black marzipan
- 1 pack of white sugar paste
- Pastel sugar paste set
- Flag cookie cutters
- Butterfly cookie cutters
- Numbers and letters cookie cutter set
- "Summer" sugar decorations
- "Candy" sugar decorations
- Pink sugar flowers
- Chocolate pen
- Edible glue
Biscuit
To start, we are going to prepare the biscuit.
We will need softened butter, so take 125gr of butter out of the fridge about 15 minutes before starting the recipe.
Softened butter is butter that has been left at room temperature; it will have a creamy texture, a bit like an ointment.
In the mixer bowl, place 125gr of softened butter and 75gr of icing sugar.


Using the flat beater (K beater), mix until you get a creamy mixture.
In a small bowl, crack 1 egg, beat it with a fork then pour half the egg (25gr) over the butter and icing sugar.
We won't need the other half of the egg; it will keep for about 2 days in a closed container in the fridge.


Add 1 pinch of salt and 1 tsp of vanilla extract.
For measuring, use measuring spoons — they are very handy! :-)
Mix with the flat beater (K beater) until all the ingredients are well combined.


Once all the ingredients are well mixed, add 225gr of flour.
Still using the flat beater (K beater), incorporate the flour for 30 seconds at speed 1.
If you mix for too long, the gluten in the flour will activate and the biscuit will rise during baking.


Finish mixing by hand, using a dough scraper if needed.
Once you can form a ball with the dough, it is ready.


Place the dough on a sheet of baking paper.
Place another sheet of baking paper on top of the dough so it won't stick to the rolling pin when you roll it out.


Using a large rolling pin and 3 mm guide sticks, roll out the dough.
Place the guide sticks on either side of the dough to get an even thickness.
Slide the dough onto a perforated tray and place it in the freezer for 15 minutes.


For a neat and even cut, I have prepared a template for you: frame template.
You will have two pieces, a complete frame and an empty inner frame.
Place the template on the dough and using a small knife, cut all around the frame.


Place a perforated mat on a perforated tray; this will ensure even baking and give the frame a nice quilted look.
Cut out the empty inner frame and place it on the perforated mat as well.
Place everything in the freezer for about 15 minutes.
You will have a little biscuit dough left over — cut it out to make biscuits for snack time. ;-)
Quick tip: If you don't use the remaining dough right away, wrap it well in cling film and place it in a freezer bag. The dough can be kept for up to 6 months in the freezer.
Preheat the oven to 135°C, fan-assisted.


Bake the biscuit in the middle of the oven for 40 minutes.
Once the biscuit is nicely golden, remove it from the oven and let it cool.
Turn the biscuit over (the side that was against the mat will be the pretty side).
For nice clean edges, you can give it a light filing with a microplane grater. Be careful — it grates very, very well, so go gently. ;-)
Note: the part with the empty inner frame is very fragile.


The frame is ready — now let's move on to the kids' favourite step!
Decorations
For the decorations, we suggest two variations. A very girly version for female teachers, and of course we also thought of male teachers by creating a slightly more neutral slate.
For the decorations, let your imagination and your children's run wild.
However, you will need a few essential tools to create your decorations: the magic powder for rolling out, a duster, and a small rolling pin with guides.
To start, prepare your work surface using the duster. Fill it with magic powder and dust a thin layer over the work surface.
Prepare your sugar paste by kneading it well between your hands to make it easier to work with.
Roll out a piece of pastel pink sugar paste and a piece of purple sugar paste from the pastel set.
Use a small rolling pin with the pink guides to ensure the sugar paste is at the right thickness throughout. (2-3 mm thickness)


Using the smallest cutter from the flag cutter set, cut out 1x in pastel pink and 1x in purple.


We will also create butterflies in pastel pink and purple.
These ejector cookie cutters are very handy — not only can we easily remove the shape from the cutter, but they also have a relief that gives the butterfly a more realistic look.
Here are my tips for these cookie cutters: Cut out a butterfly with a back-and-forth motion, holding the cutter by the base during cutting and not by the plunger. Once you have cut it out, you can gently press the plunger to give the butterfly its structure (while keeping the cutter on the work surface). Lift the cutter slightly and press the plunger again to release the butterfly completely.


Once your butterflies are cut out, place them on a bowl (pattern side against the bowl) and let them dry like that for about 1h.
It is even better to prepare the butterflies a day in advance or even longer — they are less fragile when moved that way.


Prepare the work surface for rolling out white sugar paste. As before, dust the work surface with a thin layer of magic powder.
Roll out the sugar paste (2-3 mm thickness) in the same way as for the flags and butterflies.
Using the letters and numbers cutters, cut out letters to form the phrase or word of your choice.
For one slate I chose "merci" (thank you) and for the other "bonnes vacances" (happy holidays). Let your imagination run free. ;-)
Like the butterflies, the letters have lovely little details.
Cut out the letter with a back-and-forth motion, holding the cutter by the base (as with the butterflies) and leave it in the cutter. Gently press the plunger while keeping the cutter on the work surface. Then press again to fully eject your letter.


For children who have a male teacher, we suggest creating a lovely moustache in black marzipan.
To do so, form two equal-sized balls. Then shape each ball into a teardrop.
Join the two teardrops together at their thickest part, flatten them slightly and shape your moustache.


Now that the decorations are ready, let's move on to the frame.
Roll out half the pack of black marzipan — dust the work surface lightly with magic powder, being careful not to use too much, otherwise the marzipan will have white marks.
Only the work surface should be dusted, not the surface of the marzipan. If white marks appear anyway, remove them immediately with a large brush and do not continue rolling out, otherwise the powder will stick to the marzipan.
Place 1.5 mm guide sticks on either side of the marzipan and roll it out with a rolling pin. Try to form a rectangle of at least 20 x 15 cm. It doesn't matter if it's too large — you can trim the excess afterwards.


Place the black marzipan on the biscuit base, then trim the excess marzipan with a knife.


To stick the frame and the various decorations, use a chocolate pen (a dark colour is best).
To use it, the chocolate inside the tube must be melted. Place the chocolate pen in a jug of boiling water and let it soak for 2 minutes.
Once the chocolate inside the pen is melted, remove the cap, then apply a little chocolate to the 4 corners of the frame.
Put the tube back in the hot water to keep it melted for the rest of the decorating.


Gently place the empty inner frame on top of the complete frame.
For everything you are going to stick onto the marzipan, use the edible glue with a brush.
On the other hand, use the chocolate pen for decorations that will be stuck onto the biscuit frame. Edible glue won't work as it will soak into the biscuit.


Now decorate however you like! Be creative! :-)
In the ingredients list at the top of the recipe, you will find all the sugar decorations used to decorate these slates.
In our assortment we have a wide selection of decorations for all occasions.


For transport, I recommend placing them on a tray and in a box. ;-)
We hope you and your children enjoy this recipe! ;-)
Feel free to share your slates with us on social media — we love it!
We wish you a lovely Sunday, foodies!
Karin & Sophie
P.S.: All the materials used can be found at the bottom of the recipe.


Related posts
 Juicy Matcha Muffins with Pecan Nuts & White Chocolate
Matcha Iced Latte & Coconut Variant
Pull-apart bread with fresh wild garlic pesto
Mini Banana Bread with Chocolate Chips
Juicy Matcha Muffins with Pecan Nuts & White Chocolate
Matcha Iced Latte & Coconut Variant
Pull-apart bread with fresh wild garlic pesto
Mini Banana Bread with Chocolate Chips
Leave a comment