
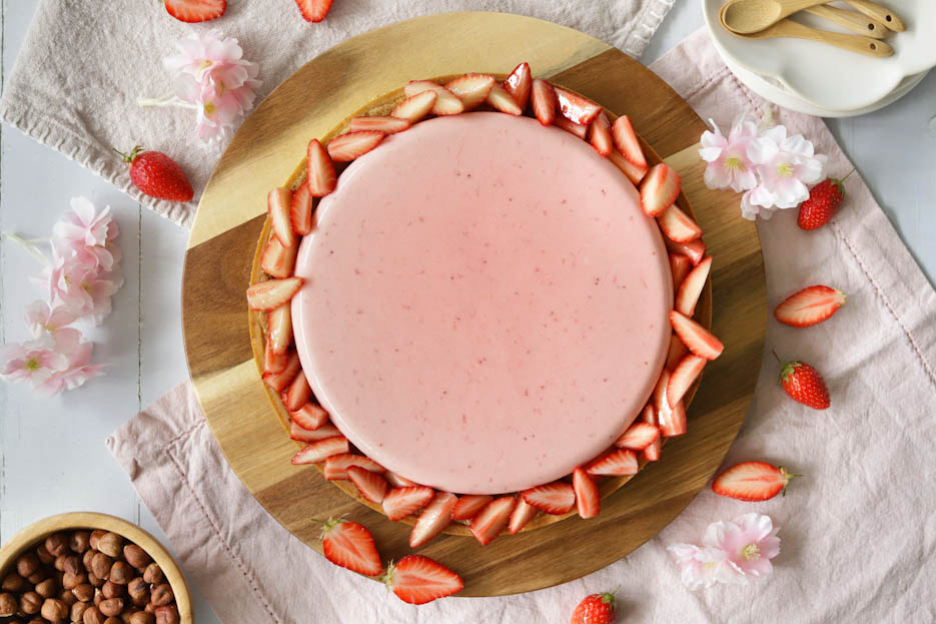
Strawberry-Hazelnut Tart
Hey there, foodies!
This week, I'm sharing a spring tart with you.
Yes, I know, strawberries haven't arrived in Switzerland yet... But here, we've already started eating them anyway.
So no debate, please... If you want to wait for the season, no worries, keep the recipe on hand. :o)
For this recipe, I'm offering you a hazelnut biscuit, a hazelnut cream and a strawberry mousse.

To make this recipe for about 10 people you will need:
- 107gr butter
- 75gr icing sugar
- 1.5gr salt
- 36gr egg
- 14gr vanilla flavouring
- 21gr ground hazelnuts
- 185gr flour
- 6gr powdered gelatin
- 30gr water
- 46gr egg whites (1.5 eggs)
- 23gr water
- 53gr sugar
- 190gr strawberries
- 25gr lime juice
- 120gr heavy cream
- 72gr butter
- 72gr sugar
- 72gr ground hazelnuts
- 60gr eggs (including the remainder from before)
- 8gr rum
- 100gr strawberries, diced
- A few strawberries
- Gelatin spray
We'll start by making the hazelnut biscuit, which will be the base of our tart.
Hazelnut biscuit
Start by cutting 107gr of butter into pieces and pour it into a large bowl with 75gr of icing sugar.
Then weigh 1.5gr of salt using the precision spoon.
Add the salt to the other ingredients, then mix using the K beater for about 1 minute.


The butter and icing sugar should be well mixed and form a kind of creamy paste.
Add 36gr of egg. To do this, I cracked an egg into a bowl, lightly mixed it with a fork so the yolk and white combined, then added only 36gr. A whole egg weighs about 50gr. And in baking, you need to be precise! ;-)
Keep the remaining egg in the fridge for the hazelnut cream.
Add 14gr of vanilla flavouring and mix again with the K beater for about 30 seconds.


Finally, add 21gr of ground hazelnuts and 185gr of flour, then mix again for 1 minute maximum.
It doesn't matter if you don't get a ball. You really must not over-mix the dough, as your tart base may puff up during baking... Here, we want a dough that stays nice and smooth, without bubbles.
That's also why the flour is added last — it limits gluten development. :o)
Once the minute is up, bring the dough together using a spatula or a dough scraper.


Place the dough between two sheets of baking paper. Use 3 mm thick biscuit rolling guides and roll your dough out as smoothly as possible.
Tip: To get a very smooth and even dough, first roll over the dough, then glide the rolling pin across it. This way you'll avoid the marks left by the rolling pin. :o)
Place the rolled-out dough in the freezer for 15 minutes. This will make it easier to work with afterwards.


Use a perforated baking tray and a perforated mat. Thanks to this duo, your biscuit will be evenly baked all over and as crispy as it should be.
Once the dough is nice and cold, cut it out using your ring. Here, I chose the perforated ring kit + 25 cm mould from Silikomart.
Place your ring on the perforated mat, as in the second photo below. :o)
I've only been working with these thermoplastic rings since I tested them! They're incredible! Goodbye metal rings, long live these ones! :-)
Now let's tackle the edges!
Form a ball of dough and roll it out again as for the base, so you can cut the edges more easily.


I cut strips of about 2 cm and place them in my ring. Be careful to press them firmly against the edge of the ring. Also make sure there are no gaps between the tart base and the sides.
If the dough becomes too difficult to work with, put it back in the freezer for 10 minutes. It's much easier to work with this dough when it's cold. :o)
There you go! You've lined your tart.


It's time to trim the excess dough.
Use a sharp knife and use the edge of the ring to cut cleanly and evenly.
Tadaa! Nice and neat!
Prick your dough all over the base with a fork. This will prevent it from forming a bubble in the centre during baking.
Place everything in the freezer for about 1h. This way, your dough won't collapse on the sides during baking.


In the meantime, we'll prepare our strawberry mousse.
Strawberry mousse
I wanted a mousse a little different from my usual strawberry mousse. My husband always says I'm not capable of making the same recipe too often... and he's not wrong! I need to test new things, learn, discover techniques and flavours, and form my own opinions.
Start by pouring 6gr of powdered gelatin into a small bowl. Make sure to use the precision spoon to get the right weight.
I almost always work with powdered gelatin. I find that the final texture is much better.
It doesn't matter whether it's fish gelatin or any other kind, it makes no difference.
Then add 30gr of very cold water, mix lightly with a spoon, then set aside.


We're going to make a mini meringue. This will give structure, but also a lovely volume to our mousse.
In a bowl, pour 46gr of egg whites, about the white of one and a half eggs.
Attach the whisk, but don't whisk yet. Set aside as is while we heat the sugar.
In a saucepan, pour 23gr of water and 53gr of sugar.


Heat the two ingredients up to 100°C. For this step, a thermometer is essential.
Do not stir! Let it heat without touching.
Once the temperature of 100°C is reached, whisk your egg whites to a foam. Not quite stiff peaks, but not liquid either. Between foam and stiff peaks. :o)
Let the sugar rise to 118°C.


Then pour the sugar in a thin stream over your foamy egg whites.
Important! Always keep the whisk running. By keeping it at low speed, the sugar will gradually mix into the egg whites, and you'll get a beautiful meringue.
Once all the sugar is incorporated, let the whisk run at medium speed for 1 to 2 minutes.
This way, your meringue will thicken slightly. Then set it aside.


In a small saucepan, pour 190gr of chopped strawberries with 25gr of lime juice.
You could use lemon juice, or fresh lemon or lime... Here, I always have my bottles of lime juice. I find it super convenient.
Bring the mixture to a boil.


Once boiling, remove from the heat, then add the gelatin. Mix gently with a whisk.
Blend everything until no strawberry pieces remain.
Place the strawberry purée in the freezer for 5 minutes. The temperature should drop back to 25-30°C maximum.


In the meantime, whip 120gr of heavy cream into whipped cream.


If your strawberry purée is still too warm, stir well from the centre outwards with your whisk, then put it back in the freezer for 5 minutes.
Once the strawberry purée is at 25-30°C, fold it in 3 additions into your whipped cream.
Gently mix with the whisk so that everything is gently incorporated.


Add the meringue all at once and gently fold in with the whisk.
You'll get a beautiful, smooth and shiny mixture. Your mousse is ready!
I really like this mousse technique with meringue. I find it gives extra creaminess.


Place your silicone mould on a tray so you can move it easily once filled. :o)
Fill your mould with strawberry mousse right up to the edge. Don't overfill, but don't underfill either.
Go right to the top and tap the tray on your work surface (very gently) so the mousse levels out and there are no air bubbles at the bottom of the mould.
Place the mould in the freezer for a minimum of 4 hours.


In the meantime, we'll make our hazelnut cream.
Hazelnut cream
It's like an almond cream, but with hazelnuts. :o)
Start by mixing with the K beater, 72gr of butter with 72gr of sugar.


Then add 72gr of ground hazelnuts, 60gr of eggs and 8gr of rum.
Crack an egg and use the remainder you kept in the fridge to make up the 60gr in total. That way, no waste. :o)
I used my vanilla-infused rum.
Mix again with the K beater until you get a nice smooth and creamy paste.
Preheat your oven to 160°C fan.


Pour your hazelnut cream into a piping bag.
Place the bag in a jug so you can fill it neatly.


Take your tart out of the freezer and pipe your hazelnut cream in. Spread it evenly using a small offset spatula.
Yes yes, it's perfectly normal not to bake the tart first — we'll bake everything at the same time. :o)


Once your tart is filled, add 100gr of finely chopped strawberries.
Then bake your tart in the preheated oven at 160°C, fan, for 25-30 minutes.
Your tart should be nicely golden. It should be beautifully coloured so that the biscuit is perfectly crispy.
To check if it's done, I always look to see if the edge is slightly pulling away from the ring.
Let it cool a little, then unmould.
If the tart sticks to the ring (this can happen with the hazelnut cream), use a sharp knife to run around the edge of the tart.


Then let it cool completely.
Assembly and decoration
It's time to assemble! Place the tart base on a tray or a pretty plate.
Make sure your tart is completely cool and that your mousse is fully set.
Unmould your mousse dome and place it directly on your tart.


Decorate the edges with a few strawberries.
I didn't feel like making a mirror glaze or using a velvet spray this time. So I tested this gelatin spray, which makes all fruit tarts or mousses shine beautifully.
This spray simply deposits a thin layer of gelatin, so the fruit doesn't dull and your desserts stay nice and shiny.


And there you have it! A beautiful tart that lets the true colour of the strawberry mousse shine through. :o)
I hope you enjoy this recipe! You can also swap the fruit and use raspberries, for example. Here, we love strawberries.
If you'd like, you can easily make the mousse one day and the biscuit the next.
Allow about 4 hours of defrosting in the fridge before serving.
You may have seen the individual version of this recipe using the perforated ring kit + silicone moulds. If you'd like to make that version again, find the PDF here.
And if you try the recipe, don't forget to leave us a comment below.
Have a lovely Sunday, foodies!
Karin
P.S.: All the equipment can be found at the bottom of the recipe.


Related posts
 Juicy Matcha Muffins with Pecan Nuts & White Chocolate
Matcha Iced Latte & Coconut Variant
Pull-apart bread with fresh wild garlic pesto
Mini Banana Bread with Chocolate Chips
Juicy Matcha Muffins with Pecan Nuts & White Chocolate
Matcha Iced Latte & Coconut Variant
Pull-apart bread with fresh wild garlic pesto
Mini Banana Bread with Chocolate Chips
Leave a comment
Comments
Question de Aurélie
By: Aurélie K. On 2025-04-13Bonjour,
J'aimerais faire cette recette pour la 1ère communion de ma fille. Mais nous serons 16 personnes... Comment je peux m'y prendre?
Merci d'avance pour votre réponse.
Aurélie
Replied by: Karin On 2025-04-14
Replied by: Laura On 2025-04-24
Question de Camille
By: Camille J. On 2021-03-21Bonjour Karin,
J'aimerais tester cette recette pour l'anniversaire de mon fils. Est-ce possible de mettre plutôt des feuilles de gélatine (je n'ai pas de poudre) ? Et quel serait le dosage ?
Un tout grand merci pour votre réponse!
J'ai hâte de tester !
Belle journée
Camille
Replied by: Karin On 2021-03-21
Replied by: Camille J. On 2021-03-22
Question de Tiziana
By: Tiziana C. On 2020-07-09Si je n'ai pas de fraises fraiches pour ma puree de fraises, combien de puree de fraise toute prete dois-je utiliser? Merci d'avance
Replied by: Karin On 2020-07-09
Question de Gwenaelle
By: Gwenaelle B. On 2020-06-17Bonjour, il faut compter combien de temps de décongélation de la mousse et le moment de servir le gâteau?
Merci pour votre réponse
Replied by: Karin On 2020-06-17
Question de Carole
By: Carole M. On 2019-05-01Merci Karin pour la réponse....
Belle journée