
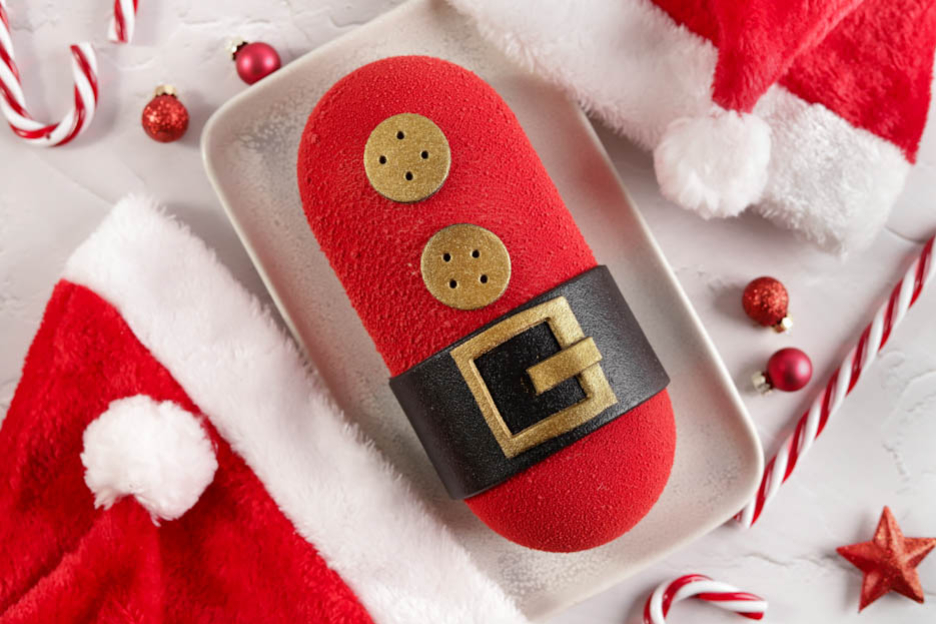
4 Chocolate Yule Log
Hey foodies!
As promised, I'm sharing a new Yule log recipe to help you prepare for Christmas! :o)
This week, I revisited the 3 chocolate entremet as a 4 chocolate Yule log: white chocolate, Dulcey, milk chocolate, and dark chocolate!
Four indulgent mousses paired with a brownie biscuit with toasted hazelnuts.

For this recipe, serving approximately 6-8 people, you will need:
- 85gr white chocolate
- 1 gelatine sheet
- 45gr milk
- 85gr cream
- 85gr Dulcey chocolate
- 1 gelatine sheet
- 45gr milk
- 85gr cream
- 50gr butter
- 100gr sugar
- 60gr dark chocolate
- 1 egg
- 100gr flour
- 25gr almond powder
- 50gr hazelnuts
- 65gr milk chocolate
- 1 gelatine sheet
- 45gr milk
- 85gr cream
- 60gr dark chocolate
- 1 gelatine sheet
- 45gr milk
- 85gr cream
- Red velvet spray
- Black marzipan
- Gold metallic spray
Let's get started!
For all 4 mousses, the process will be the same... Only the amount of chocolate will vary depending on the type of chocolate (more or less fatty).
I used quality chocolate, including the brands Callebaut and Valrhona for the Dulcey. :o)
The best cakes are made with the best ingredients.
We'll start by making the white chocolate mousse.
White chocolate mousse
In a bowl of cold water, soak 1 gelatine sheet.


Melt 85gr of white chocolate in the microwave for 1 minute at 600 Watt.
Once the chocolate is completely melted, set it aside for a few minutes.
Pour 45gr of whole milk into a saucepan.


Bring it to a boil then remove from the heat.
Squeeze out the gelatine sheet and add it to your milk. Stir gently for 1-2 minutes to make sure the gelatine is fully dissolved in the milk.


Pour the milk and gelatine in 3 additions into your chocolate.
It's very important to pour the milk in 3 additions over the chocolate to create a beautiful emulsion.
This way, your ganache will be nice and shiny and won't split. :o)
Once the milk is well incorporated into the chocolate, let it cool for a few minutes at room temperature.


Then pour 85gr of full-fat cream into a tall jug and whip your cream until lightly whipped.
The whipped cream should be just whipped. If you whip it too much, your mousse will be a bit too firm afterwards. So just lightly whipped. :o) As soon as marks appear when you move the whisk, it means it's ready.
Place your cream in the fridge while the chocolate reaches the right temperature.
The chocolate is ready when it has dropped below 30°C. Get your thermometers ready!


Once the chocolate/milk mixture is at the right temperature (between 25 and 29°C), pour it into your whipped cream in 3-4 additions.
This way, your cream won't collapse from the heat.
Pour a little chocolate, fold in gently with the whisk, then add a little more chocolate...and so on...
Personally, I fold gently with the whisk, which continues to very lightly whip my cream. :o)
Once everything is well combined, you'll get a creamy and airy mixture. :o)


For this recipe, I used the "Mr. Pillow" mould because I had seen this design at Silikomart last year and thought the idea was amazing. So this decoration didn't come from my own imagination! :o)
Place your mould on a perforated tray so you can easily transport it later.
Pour all of the white chocolate mousse into the mould. Tap the mould gently on your work surface so the mousse is smooth and even.
Place the mould in the freezer for at least 30-45 minutes. After 30-45 minutes, you can pour in the second mousse. :o)


Once the 30-45 minutes have passed, we start on the Dulcey mousse.
Dulcey chocolate mousse
The process is the same as for the previous mousse.
Soften 1 gelatine sheet.


Melt 85gr of Dulcey chocolate in the microwave for 1 minute at 600 Watt.
Heat 45gr of milk, then off the heat, add the softened and squeezed gelatine.


Pour the milk in 3 additions over the chocolate and let the temperature drop to 29°C.


Whip 85gr of full-fat cream.
Pour the chocolate in 3 additions into the whipped cream.


Gently fold everything together well.
Make sure the white chocolate mousse is slightly set on top. Normally, it will have just set on top within 30-45 minutes, so that's perfect.
Pour the Dulcey mousse over the white chocolate mousse and place the mould back in the freezer for another 30-45 minutes.


We'll now prepare our brownie biscuit. This way, it will have plenty of time to cool down before we use it.
Chocolate-hazelnut brownie
In a bowl, pour 50gr of butter and 100gr of sugar, then whisk the mixture for 2 minutes.


In another bowl, pour 60gr of dark chocolate and melt it in the microwave for 1 minute at 600 Watt.
Add the melted chocolate to the mixture.


Add 1 egg and whisk again for a good minute.
You'll get a creamy mixture.


Finally, add 100gr of flour and 25gr of almond powder then whisk again for 1 minute.
The texture will become quite thick, that's normal.


Get a perforated tray lined with a silicone mat and an adjustable frame.
Preheat your oven to 200°C, fan-assisted.
Place your adjustable frame on your silicone mat, then fix the metal insert to get a frame of 9 x 21 cm. If your frame doesn't have a metal insert, do the same with aluminium foil. :o)
Spray your frame with demoulding spray so nothing sticks when you remove it.
Spread your brownie batter as evenly as possible using an offset spatula. I didn't go all the way to the end of my frame, as it was too long... I spread it to about 21 cm.
Yes, my dear husband pointed out that I just had to turn my frame so it would be the right size... Anyway, that works too.


Place 50gr of whole hazelnuts in a plastic bag then bash them with a rolling pin or a sturdy tool.
This way you'll get halves or quarters of hazelnut. No need to make crumbs. :o)


Pour the hazelnuts over your brownie and press lightly so the hazelnuts stick well to the biscuit.
Bake your brownie for 20 minutes in your preheated oven at 200°C, fan-assisted.
Your hazelnuts will toast. :o)
Once the biscuit is baked, run a knife around your frame, then remove the frame.
Get the cutter included in the "Mr. Pillow" mould.


Place the cutter on your brownie (you should see the inscription "outside" on top), then cut around it using a knife.
Finish cutting the biscuit with the cutter. This way, the desired shape will be maintained without crushing the brownie.
Let the brownie cool at room temperature or even in the fridge.


We now prepare the milk chocolate mousse.
Note that the chocolate quantities change!
Milk chocolate mousse
Soften 1 gelatine sheet in a jug of cold water.


Melt 65gr of milk chocolate in the microwave for 1 minute at 600 Watt.
Heat 45gr of milk, then off the heat, add the softened and squeezed gelatine.


Pour the milk in 3 additions over the chocolate and let the temperature drop to 29°C.


Whip 85gr of full-fat cream then pour the chocolate in 3 additions into the whipped cream.


Pour the milk chocolate mousse over the Dulcey mousse. :o) Place the mould in the freezer for 30-45 minutes.


And finally, we'll prepare our dark chocolate mousse.
Note that the chocolate quantity is also different!
Dark chocolate mousse
Soften 1 gelatine sheet.


Melt 60gr of dark chocolate in the microwave for 1 minute at 600 Watt.
Heat 45gr of milk, then off the heat, add the softened and squeezed gelatine.


Pour the milk in 3 additions over the chocolate and let the temperature drop to 29°C.


Whip 85gr of full-fat cream then pour the chocolate in 3 additions into the whipped cream.


Finally, pour the dark chocolate mousse into your mould.
Add the brownie biscuit with the hazelnuts facing down into the mousse.
It's fine if some hazelnuts fall into the mousse. :o)
Press lightly on the biscuit so it adheres well to the mousse and doesn't stick out too much from the mould.
Time for at least 5-6h of freezing! You can also leave your Yule log in the freezer for 2-3 weeks without any problem! Super handy for preparing Christmas desserts in advance!


Decorations
On the day or the day before, prepare a velvet spray, a tall box, a turntable and some baking paper.
The tall box will serve as protection so you don't spray your entire kitchen! :o) Super practical! Cocoa butter is not easy to clean. Personally, I reuse my box about twenty times without any problem.
Place your turntable inside the box and cover it with baking paper to avoid getting it dirty.
Place the velvet spray bottle for 10 minutes in a jug of lukewarm water (30-35°C) to allow the cocoa butter inside the bottle to warm up and reach optimal consistency when used.
Take your mould out of the freezer and unmould it.
To unmould it easily, start by peeling away all around the edge of the mould.
Place your entremet on the turntable.


Shake your velvet spray can vigorously for 30 seconds. This is important so the cocoa butter mixes well with the rest.
Spray your entremet keeping a distance of approximately 15 to 20 cm.
Finally, use two offset spatulas to place your entremet on a Yule log board.
Place your entremet in the fridge while you finish the rest of the decoration.


Get a small rolling pin, a pack of black marzipan, a pastry wheel, a 5 cm square cutter, another 3.5 cm square cutter and a 3.5 cm round cutter.
Roll out the marzipan thinly.
Lightly dust your work surface with magic rolling powder so nothing sticks.


Cut a long strip 5 cm wide using the band cutter.
Once the strip is cut, place it on the entremet.
Press the strip around the entremet, then cut off the excess with a thin, sharp knife.
Once the strip is well pressed and cut, place your entremet back in the fridge.


Roll out a piece of marzipan with the purple rings (a little thicker than before).
Cut out one 5 cm square and 2 rounds of 3.5 cm.


Then cut out the centre of your 5 cm square using a 3.5 cm square cutter.
Cut a small strip and apply it to the right edge of your square. There's a lovely belt! :o)
Using a 3 mm nozzle, make 4 small holes to create a pretty button.
All that's left is to spray our belt and our two buttons to get a lovely golden colour. I used the gold metallic spray from Decora! A little gem. :o)
Let the spray dry slightly then place your belt on the black band.
I used two small offset spatulas to position my belt properly.
Do the same with the two buttons. :o)


And here's the result! A beautiful entremet that really represents Christmas!
You'll need at least 6-8h in the fridge for the Yule log to be fully thawed before serving.
I hope you enjoy this recipe and that this 4 chocolate Yule log intrigues you enough to give it a try.
Have a great Sunday, foodies!
Karin
P.S: All the products used can be found at the bottom of the recipe.


Watch our recipe on video!

Related posts
 Juicy Matcha Muffins with Pecan Nuts & White Chocolate
Matcha Iced Latte & Coconut Variant
Pull-apart bread with fresh wild garlic pesto
Mini Banana Bread with Chocolate Chips
Juicy Matcha Muffins with Pecan Nuts & White Chocolate
Matcha Iced Latte & Coconut Variant
Pull-apart bread with fresh wild garlic pesto
Mini Banana Bread with Chocolate Chips
Leave a comment
Comments
Question de Chrisna
By: Chrisna M. On 2024-12-12Bonjour, je prépare la bûche pour dimanche en début d’après-midi serait-il possible de mettre la bûche dans le frigo déjà à environ 21h samedi soir ou elle ne tiendra pas jusqu’au lendemain vers 14h ?
Replied by: Karin On 2024-12-12
Replied by: Chrisna M. On 2024-12-12
Question de Charlotte
By: Charlotte C. On 2024-11-26Bonjour,
J’aimerais faire l’entremet poire-chocolat avec ce moule (Mr Pillow). Quel moule conseillez-vous pour l’insert?
Merci d’avance ?
Replied by: Karin On 2024-11-26
Question de Jessica
By: Jessica B. On 2023-12-20Bonsoir,
J ai un petit soucis avec la partie mousse chocolat Dulcey. J ai suivi la recette mais au moment de mélanger la crème dans le mélange chocolat/lait refroidi à 29 degré, le tout tranche et se sépare, une catastrophe. Mon chocolat devient assez dur une fois refroidit à 29 degré, est ce normal?
Déjà un grand merci pour votre réponse!!!!
Replied by: Karin On 2023-12-21
Question de Alexandre
By: Alexandre G. On 2023-12-17Bonjour,
Comment faire pour que le brownies ne soit pas trop dur lors de la coupe de la bûche ? (Peut-être un faux pas lors de la préparation de mon côté !). Merci
Replied by: Laura On 2023-12-18
Question de Emilie
By: Emilie S. On 2023-10-26Bonsoir,
Est-ce qu’on peut préparer les 3 mousses en même temps et en laisser 2 au frigo en attendant que les couches précédentes soient congelées ?
Et est-ce qu’on peut remettre au congélateur la bûche après l’avoir sprayée au spray velours ?
Merci pour votre aide et bonne fin de semaine !
Émilie
Replied by: Karin On 2023-10-27
Question de Marie-José
By: Marie-José P. On 2022-12-12Bonjour,
Le glaçage je le fais le jour où je la sort pour la manger c'est bien ça ?
Merci pour votre réponse, je n'ai jamais fait de bûche glacé.
Replied by: Laura On 2022-12-12
Replied by: Marie-José P. On 2022-12-12
Replied by: Laura On 2022-12-13
Question de Marie
By: Marie B. On 2022-12-06Bonjour,
Pour le chocolat blond, est-ce que je peux utiliser le « callebaut chocolat gold » à la place du « Valrhona blond Dulce » ?
Merci pour vos précieux conseils et belle journée.
Marie
Replied by: Karin On 2022-12-07
Replied by: Marie B. On 2022-12-08
Replied by: Marie B. On 2022-12-09
Réponse à Valérie
By: Karin On 2021-12-22Merci pour votre message. Pour réaliser cette recette dans le moule à bûche Lana, il vous faudra faire la recette x1.2 (donc chaque ingrédient x 1.2). Concernant le temps, pour cette recette ce qui est long c'est les prises au congélateur. Il faut compter 45min pour chaque mousse du coup normalement en 5 heures votre bûche est réalisée ( décoration et prise au congèle comprises)
Belle journée et bonne pâtisserie
Question de Sarah
By: Sarah S. On 2021-12-02Bonsoir,
Quand puis-je la sortir du congélateur pour la conserver au frigo avant de la servir ?
Belle soirée
Sarah
Replied by: Laura On 2021-12-03
Réponse
By: Laura On 2021-11-18Je pense que vous avez dû trop monter votre crème par rapport à notre recette.
Du coup vos mousses ont pris plus de volume, donc moins de place pour la dernière couche. Ca fera une 3 chocolat ;-)
Belle journée!
Laura
Question de Michèle
By: Michèle B. On 2021-11-14Bonsoir, cela pose t il un souci de laisser plus de 30-45min les couches de chocolat prendre au congélateur ? Merci d’avance
Replied by: Karin On 2021-11-14
Replied by: Michèle B. On 2021-11-18
Question de Aline
By: Aline B. On 2020-12-15Bonjour
Si on veux faire cette recette dans le moule starlight, est-ce qu'il faut augmenter la quantité des mousses ?
Replied by: Karin On 2020-12-16
Question de Mélissa
By: Mélissa P. On 2020-12-06Super recette, dommage que le temps de préparation pour chaque étape ne soit pas mentionné.
Réponse à Coralie
By: Karin On 2019-12-26Super! Merci pour votre retour! Cela nous fait très plaisir! :o) Et en lila il devait être très beau! Belles fêtes de fin d'année. Salutations. Karin
Réponse
By: Karin On 2019-12-23La buche se sert froide mais non congelée. :o) Il vous faut la laisser décongeler au frigo pendant 6h environ. Belle journée. Karin
Réponse à Coralie
By: Karin On 2019-12-21Oui alors à mon avis c'est un manque de cuisson car le brownies cuit ne colle pas une fois refroidit.
Mais laissez-le bien refroidir avant de le décoller du tapis. :o)
Belles fêtes de fin d'année.
Karin