
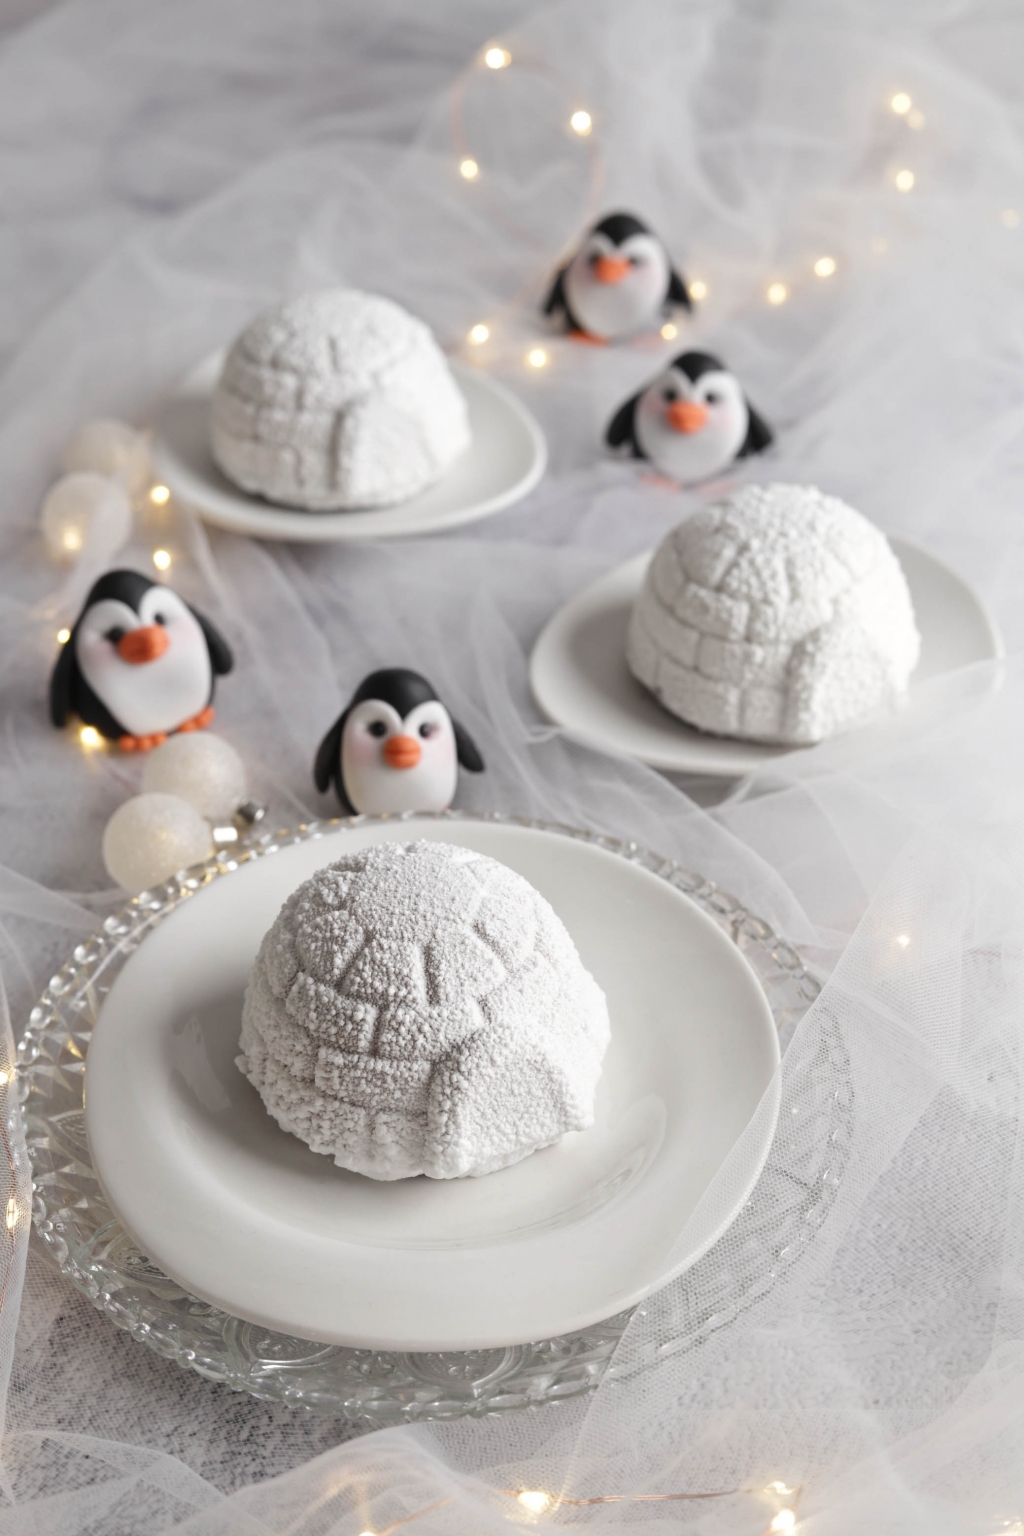
Peanut-chocolate igloos
Modelled penguins
Hey there, food lovers!
You've probably already seen our little tutorial on modelled penguins – here are the matching igloos! ;o)
These individual igloo-shaped desserts are made up of a peanut caramel, a milk chocolate mousse and a delicious soft chocolate sponge. The flavour is slightly reminiscent of a Snickers.
I recommend preparing these desserts over several days... It's less stressful and your preparations will also be nicely set (in the freezer) when you need to decorate them. :o)
For example:
D-2: the chocolate sponge and the peanut caramel
D-1: the chocolate mousse and assembly
Day D: velvet spray decoration

To make 6 igloos, you will need:
Chocolate sponge
- 100g butter
- 50g dark chocolate
- 70g flour
- 15g unsweetened cocoa
- 40g almond powder
- 4g baking powder
- 1.5 eggs (90g)
- 80g sugar
Peanut caramel
- 1 gelatine sheet
- 100g sugar
- 80g full-fat cream
- 100g peanut butter
- 1 pinch of coarse salt
- 60g peanuts (unsalted)
Milk chocolate mousse
- 1.5 gelatine sheets
- 70g milk
- 100g milk chocolate
- 120g full-fat cream
Decoration
- White velvet spray
- Sparkling glitter
- Blush brush
Chocolate sponge
Start by preheating your oven to 160°C, fan-assisted.
Then melt 100g of butter and 50g of dark chocolate for about 1 minute in the microwave at 600W.
The chocolate should be completely melted, so reheat it if there are still pieces of chocolate after mixing.
Leave the butter-chocolate mixture to cool to room temperature.


Crack 2 eggs and beat them with a fork, weigh out 90g and pour into a bowl.
Then add 80g of sugar and whisk everything together until the mixture becomes light and frothy.


Meanwhile, put all the dry ingredients, i.e. 70g of flour, 15g of unsweetened cocoa, 40g of almond powder and 4g of baking powder into a bowl and mix everything together with a whisk.
If you often read our blog articles, you know that we weigh all small quantities with our spoon scale. ;o)


Once the egg-sugar mixture is nice and light and frothy, you can sift the dry ingredients into it. This is why it is important to use extra-fine almond powder ;o)
Mix the batter again at low speed for 30 seconds.


Then add the melted butter-chocolate mixture. Make sure the butter-chocolate mixture is no longer hot, otherwise your sponge will collapse.


To bake the sponge, I used the génoise mat as a base and an adjustable frame set as small as possible (18 x 27 cm).
You can easily use baking paper instead of the génoise mat.
Place the mat and the frame on a perforated baking tray and spray everything with release spray. This will make unmoulding very easy! :o)
Then pour in the sponge batter and smooth it out with a small offset spatula.


Bake the sponge at 160°C for approximately 15-20 minutes (fan-assisted).
Then leave it to cool and remove the frame.
Cut out 6 circles with a diameter of 6.5 cm. For this, I used round cookie cutters from Decora. We kept the rest of the sponge for our break. ;o)
To prevent the sponge from drying out, it is best to wrap it in cling film until it is needed.


Peanut caramel
Start by soaking 1 gelatine sheet in cold water.
Then heat 80g of full-fat cream for 1 minute in the microwave at 600W. Set aside.
Do the same for the 100g of peanut butter. The aim is to soften and temper the peanut butter so that it is easier to incorporate afterwards. Also place it for 1 minute in the microwave at 600W.
In a saucepan, pour in half the sugar (50g).


It is very important to never use a spatula or any other tool in your caramel!
Resist the urge to stir! By stirring, the sugar crystals stick together and instead of getting a nice smooth caramel, you'll end up with lumps.
As soon as it starts to melt, add the remaining sugar (50g) and wait again for it to melt. Continue like this until all the sugar has melted.


Occasionally remove the saucepan from the heat and gently swirl it back and forth to distribute the sugar and prevent it from burning.
Then pour the 80g of previously heated cream into the caramel. Since the cream has already been heated, the caramel will barely splatter and won't seize up.


Cook everything (stirring continuously with a whisk) until you obtain a smooth, homogeneous mixture, then add the squeezed gelatine sheet. Mix well.


Turn off the heat and add the 100g of previously heated peanut butter and mix everything together. Having heated the peanut butter will prevent the caramel from becoming too hard.


Add a pinch of salt and finally 60g of unsalted peanuts.
Mix everything together with a spatula.


Then distribute the mixture into a half-sphere mould using a spoon. Place everything in the freezer for at least 3 hours.
I used a 6 cm mould for my recipe, but if you want more mousse and a smaller insert, you can also use a 5 cm mould. It's up to your taste! ;o)


Milk chocolate mousse
For the chocolate mousse, soak 1.5 gelatine sheets in cold water.
Melt 100g of milk chocolate in the microwave for 1 minute at 600W.
It's not a problem if it's not completely melted.


Pour 70g of milk into a saucepan and bring it to the boil.
Then squeeze out the gelatine and add it to the milk. Gently stir everything for 1 to 2 minutes so that the gelatine dissolves evenly in the milk.


Then pour the milk-gelatine mixture over the chocolate in 3 additions. This way, the ganache will be glossy and won't split.
Place the ganache in the fridge. Its temperature must reach 25-30°C. Check the temperature with a thermometer.


Whip 120g of full-fat cream into whipped cream. Be careful, it should not be completely stiff.


Once the ganache is at the right temperature, gradually fold in the whipped cream until you obtain a beautiful mousse.


Fill a piping bag with the mousse. You can use a jug to help fill it more easily.


For my dessert, I chose the Silikomart silicone Igloo mould.
Using the piping bag, fill the mould 1/3 full with mousse.


Then take the peanut caramel half-spheres out of the freezer, unmould them and place them on the mousse, right in the centre.
Press gently on the insert until the mousse rises up. Then cover everything with the remaining mousse.


Finally, place the chocolate sponge circles on the mousse and press gently. Smooth everything out with a small offset spatula.
Put the igloos back in the freezer for 6 hours.
To avoid all the Christmas stress, it is also possible to prepare the igloos 2 weeks in advance and store them in the freezer, well wrapped.


Decoration
To achieve a beautiful snow effect on my igloos, I opted for a white velvet spray decoration. My desserts will be finished in no time. :o)
For the velvet spray to work properly, it is important that your dessert is well frozen, as this is the only way to achieve the beautiful velvet effect.
To start, I recommend immersing the spray in hot water for 10 minutes to liquefy the contents.


Prepare a tall cake box and a turntable covered with cling film.
I really recommend using a tall cake box (it will protect your entire kitchen) as the velvet spray is very volatile and the cocoa butter it contains adheres very well to all surfaces... And it's a real nightmare to clean!


Remove the igloos from the freezer and unmould them. Then place two of them on the turntable and put the rest back in the freezer.
I prefer to spray two at a time.


Shake the spray and spray evenly from a distance of approximately 30-40 cm.
Warning! We have found that the large Silikomart cans have a lot of pressure and spray strongly.
So be very careful and don't aim directly at the dessert to avoid a disaster. ;o)


For the finishing touch, I added sparkling glitter to my igloos using a blush brush. Real snow sparkles in the sun too ;o)


If you want to make these desserts in advance, you can spray them and put them straight back in the freezer wrapped in a box.
Otherwise, you will need to allow a minimum of 5h in the fridge so that the igloos are completely thawed before serving.
You can serve them directly on a plate or, if you need to transport them, it is recommended to use small round bases and a transport box.
And there you have it, my igloos are ready! If you'd like to decorate them with cute penguins, check out our tutorial HERE.
I hope you enjoy the recipe and I wish you a lovely Sunday! :0)
Jenny
P.S.: All the materials used can be found at the bottom of the recipe


Related posts
 Juicy Matcha Muffins with Pecan Nuts & White Chocolate
Matcha Iced Latte & Coconut Variant
Pull-apart bread with fresh wild garlic pesto
Mini Banana Bread with Chocolate Chips
Juicy Matcha Muffins with Pecan Nuts & White Chocolate
Matcha Iced Latte & Coconut Variant
Pull-apart bread with fresh wild garlic pesto
Mini Banana Bread with Chocolate Chips
Leave a comment
Comments
Question de Aurélie
By: Aurélie T. On 2024-12-15Bonjour
J’aimerais faire la recette avec le moule à bûche Lana (1200ml), il faudrait doubler la recette?
Merci pour le retour, belles fêtes
Replied by: Karin On 2024-12-16
Replied by: Aurélie T. On 2024-12-16
Replied by: Karin On 2024-12-16
Question de Charlotte
By: Charlotte J. On 2024-02-18Bonjour :)
Une fois que les igloos ont décongelé pendant 5h, combien de temps peuvent-ils rester au frigo, avant de les déguster?
Si je les fais 1 semaine avant, est-ce que je peux tout de même les sprayer le jour J ou est-ce mieux de les sprayer le jour de la préparation et les remettre au congélateur?
Un grand merci pour votre retour !
Charlotte
Replied by: Karin On 2024-02-19
Question de Irène
By: Irène G. On 2022-12-13Bonjour, si je prépare les igloos 10 jours avant je peux les laisser dans le moule ou c'est mieux de les démouler pour les garder au congélateur?
Replied by: Laura On 2022-12-14