
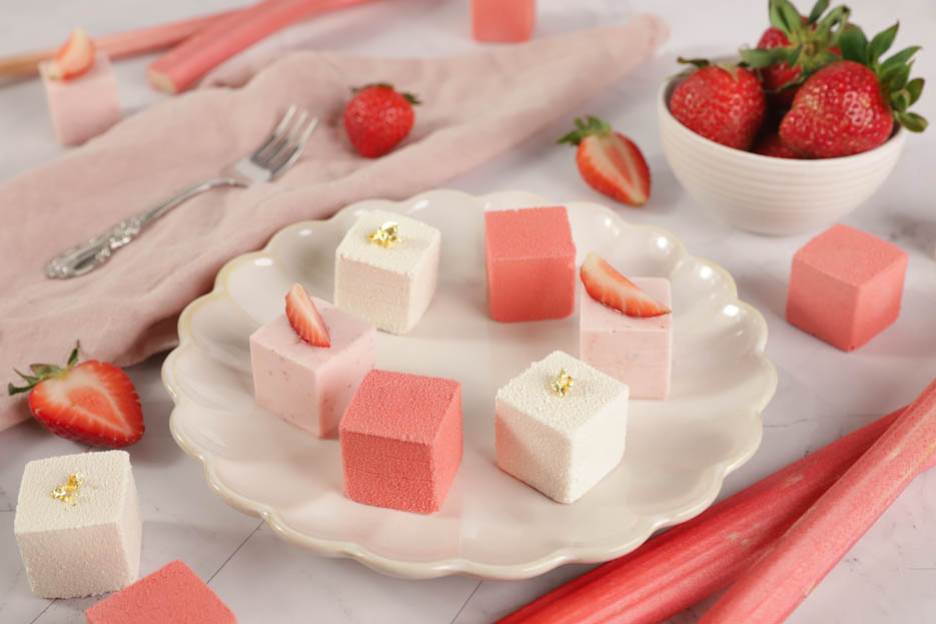
Mini strawberry-rhubarb entremets
Hello food lovers,
Fancy a fresh, fruity and indulgent dessert? We're offering you a delicate combination of strawberry, rhubarb and a crunchy biscuit, presented in individual portions for a result that is as refined as it is practical to serve.
Each little cube reveals a tangy rhubarb centre, a light strawberry mousse and a base that is both soft and crunchy. A perfect balance of textures and flavours, ideal for impressing your guests or simply treating yourself.
Follow our recipe to make these modern and elegant entremets, accessible even to passionate home bakers.
We also made this recipe in a different mould. Go and check out how it looks here: Strawberry-rhubarb entremets.
Let's get started with the recipe!

To make 25 small cubes, you will need:
- 1.2gr of powdered gelatine
- 6gr of water
- 120gr of rhubarb
- 45gr of sugar
- 10gr of water
- 1 tsp vanilla extract
- 30gr of butter
- 30gr of flour
- 30gr of brown sugar
- 30gr of ground almonds
- 0.3gr of Guérande salt
- 10gr of crushed lace crêpes
- 20gr of butter
- 40gr of ground almonds
- 10gr of flour
- 30gr of egg white (1 egg)
- 26gr of sugar
- 95gr of strawberries
- 2gr of lemon juice
- 10gr sugar
- 10gr of water
- 3gr of powdered gelatine
- 15gr of cold water
- 150gr of heavy cream
- 25gr of icing sugar
- Gelatine spray
- Pink velvet spray
- White velvet spray
- Gold leaf
- Strawberries
We'll start by making the rhubarb compote, as it will need to set in the freezer.
Rhubarb compote
Start by weighing 1.2gr of powdered gelatine using your precision spoon scale, then add 6gr of cold water.
I use fish-based powdered gelatine, as its texture is much more pleasant in the mouth once set.
Set the gelatine aside while it hydrates.


Cut 120gr of fresh rhubarb into pieces of approximately 1 cm. No need to peel the rhubarb! Leave it as is, unless it's a little fibrous.
Pour the diced rhubarb into a saucepan and add 45gr of sugar and 10gr of cold water.
Mix everything together with a spatula.


Bring the rhubarb to a boil, stirring occasionally with a spatula.
Once the mixture is boiling, reduce the heat slightly and leave to cook until you have a nice compote.
Your compote is ready when the rhubarb has completely dissolved and when you scrape the bottom of the pan with your spatula, the line remains visible (as in the second photo below).
Immediately remove your rhubarb from the heat.


Add the gelatine and 1 tsp of vanilla extract to soften the acidity a little.
Then blend everything with a hand blender to obtain a smooth, lovely compote.
Normally, I don't necessarily blend my rhubarb, but since we're making micro-inserts, it needs to be fine enough.


Pour the rhubarb compote into a piping bag and set aside. Use a jug to fill the piping bag neatly.


Use the Truffles 5 mould in the shape of mini spheres. This mould is perfect for making our compote inserts.
Don't forget to place the mould on a perforated tray so you can move it easily once filled.
Fill your spheres 3/4 full and tap the mould firmly on the work surface so the compote spreads evenly.
Make sure you don't fill the cavities completely, as if your spheres are too full, they won't fit inside the cubes afterwards.
Leave approximately 0.3 mm of space at the top.
For these entremets, we will need 25 spheres.
Once the cavities are filled 3/4 full, place your mould in the freezer for at least 1 to 2 hours.


While the inserts are setting in the freezer, we can prepare the crunchy part of our biscuit.
Almond streusel
In a bowl, pour 30gr of butter, 30gr of flour and 30gr of brown sugar.


Also add 30gr of ground almonds and 0.3gr of Guérande salt.
I used Guérande salt so you can really taste that little salty flavour in the biscuit. I love it! :o)
Mix everything by hand! Rub the mixture well so that your streusel is nice and crunchy after baking.


Once your mixture forms a kind of dough, add 10gr of crushed lace crêpes.
Mix lightly again by hand so the lace crêpes are well incorporated into the mixture.
Don't overwork the mixture! We want to keep the crunch of the lace crêpes. :o)
Place the dough on a silicone mat and preheat your oven to 160°C, fan-assisted.


Using a rolling pin, roll out your streusel dough covered with a sheet of baking paper to 3 mm thickness.
Use biscuit spacers to achieve the same thickness throughout. This is important, as we'll be working with small pieces.
Roll your dough into a rectangle of approximately 12 x 25 cm.
Place your silicone mat on a perforated tray for perfect baking.
Place an adjustable frame around your biscuit for baking. Since your biscuit will be approximately 12 x 25 cm, you will need to use the frame along with the divider sold with it to use only part of the frame.
The frame will keep the streusel in place, but it will be especially useful for preventing the financier from spreading during baking.
Bake your streusel in the oven preheated to 160°C for 15 to 20 minutes.


While the streusel is baking, we'll prepare our financier.
Financier
Start by making a brown butter.
To do this, pour 20gr of butter into a saucepan and bring it to a boil until it turns golden.
You'll notice the butter giving off a delicious nutty aroma. :o)


Immediately remove the saucepan from the heat and pour the butter into a very cold small glass bowl, then set aside.
In a bowl, pour 40gr of ground almonds and 10gr of flour, then mix with a spoon.
It's important to use extra fine ground almonds. The ones available in Swiss shops are unfortunately too coarse.
Set the mixture aside.


In another bowl, pour 30gr of egg white (1 egg) and 26gr of sugar.
Whisk the two ingredients together until you have a lovely French meringue.
This may take a little time if your egg was in the fridge.


Then add the ground almond/flour mixture and fold in with a rubber spatula.
Be careful not to deflate the meringue... Go gently and with care.


Once the mixture is well combined, add the cooled butter and mix again with the spatula.


The streusel is baked, take it out of the oven and pour the financier batter over it. Smooth everything out well with an offset spatula.
Bake again for 25-30 minutes, still at 160°C fan-assisted.


Once the biscuit is lightly golden, remove it from the oven. We're going to unmould it and cut the biscuits very quickly, before they harden too much.
Run the knife all around the frame and unmould the biscuit.
Then cut small squares of 2.5 x 2.5 cm. Use a ruler to be as precise as possible. :o)
Set the small biscuits aside for later.


We can now make the final step of our recipe.
Strawberry mousse
In a jug, pour 95gr of fresh strawberries with 2gr of lemon juice.
Note! Not concentrate, but real lemon juice. :o) Either a fresh lemon or the bottled juice from Alnatura (Migros).


In a small saucepan, pour 10gr of sugar with 10gr of water and bring the mixture to a boil.


Once the syrup is boiling, immediately remove the saucepan from the heat and pour it over the strawberries.
Blend your strawberries and the syrup with a hand blender, then set aside.


In a small bowl, pour 3gr of powdered gelatine and add 15gr of cold water.
Mix lightly with a spoon and let the gelatine hydrate for a good 5 minutes.


Once the gelatine is hydrated, take a small saucepan and add half of the strawberry purée.
Bring it to a boil, then add the hydrated gelatine.


Mix the gelatine well into the hot mixture. Let it melt for 1 to 2 minutes in the strawberry purée.
Pour the heated portion into the cold portion and mix again with a rubber spatula.
Place the mixture in the freezer for 5 to 10 minutes to cool down. We'll use it once it has reached approximately 25°C.
Check the temperature from time to time with a thermometer so the mixture doesn't cool too much, and stir it every 3 to 4 minutes.


In a large bowl, pour 150gr of heavy cream and 25gr of icing sugar.
Whip the two ingredients together to obtain a lovely, slightly firm whipped cream.
Be careful not to over-whip it! It should be just whipped so it blends more easily with the strawberry purée.


Once the strawberry purée has reached a maximum temperature of 25°C, fold it in 3 additions into the whipped cream and mix gently with a rubber spatula.
Always proceed this way: incorporate the warm mixture into the cold preparation in 3-4 additions. Never the cold into the warm! :o)


Once the mousse is well mixed, pour it into a 40 cm piping bag.


All our preparations are ready, we can now move on to the assembly.
Assembly
Use the Silikomart "Ice 26" mould. I used this mould, which comes with a lid. It's just perfect for making cubes with nice smooth edges.
Start by placing a small dot of strawberry mousse at the bottom of the cavities. Just a tiny amount! This is to fill in any small imperfections in our biscuit when unmoulding.
Place the biscuit squares in your mould with the light side (the financier) facing up, towards you.
Since the streusel is smoother than the financier, it makes more sense to place it this way.


Press firmly on each biscuit so there are no air bubbles between the mousse and the biscuit.
The mousse will come up the sides, and that's perfect!
Then add the strawberry mousse into each of the cavities.


Tap the mould on your work surface so the mousse spreads well into the edges.
Make sure you don't fill right to the top. You can always add more later. :o)
Unmould your little rhubarb balls and place one in each cavity.
Press firmly on your rhubarb ball so it adheres to the biscuit and doesn't stick out of the mould.


Once all the rhubarb balls are in place, add the remaining strawberry mousse, then smooth lightly so it covers the balls well. Use an offset spatula to help.
No need for a perfect finish... You just need the rhubarb to no longer be visible.


Then place the lid and clip it across the entire surface.
To make sure it's properly fixed on each cube, I run my finger several times along the lines.
This way, the excess mousse will come out and you'll get perfect cubes. :o) Yes yes, you can eat the excess.
Slide your mould onto a perforated tray and place everything in the freezer for at least 2 to 3 hours.


Once the mini entremets are well frozen, we can move on to the decoration.
Decorations
For this recipe, we chose a simple and elegant decoration. A lovely white and pink velvet spray finish accompanied by a few cubes sprayed with gelatine to keep their natural colours.
Start by placing the white velvet spray and the pink velvet spray in a jug of lukewarm water (warm tap water is sufficient).
Leave them to soak for approximately 10 minutes. This will allow the cocoa butter in the bottle to become fluid, giving a lovely final result.


Unmould the cubes, start by removing the lid, then unmould each cube carefully.
Arrange them on a perforated tray covered with baking paper. Once all pieces are unmoulded, place them back in the freezer.


On a turntable, place a sheet of baking paper, then arrange 8 small cubes on it.
Cocoa butter is very volatile. To avoid spraying it all over your kitchen, I recommend spraying your pieces inside a tall box.
For a fine and even result, hold your bottle approximately 20-25 cm away while you spray your desserts.


For the white ones, proceed in the same way as for the pink ones! ;o)


Finally, we'll spray the last cubes with gelatine spray. This will make your mousse shine and prevent it from drying out.
All our desserts are sprayed — for the final decoration, let your imagination run free. On some, add strawberry quarters, and on others, a gold leaf. Don't forget to handle the gold leaves with precision tweezers. ;o)


And here is the result!
Place everything in the fridge. Allow 1 to 2 hours for the pieces to be completely thawed before enjoying them.
Very lovely and above all very refreshing in this hot weather. :o)
These mini entremets will keep for up to 2 days in the fridge in a box.
You may have already seen this recipe in the form of a Rubik's cake. Unfortunately the supports are no longer available from our supplier. That's why we decided to rework the recipe into individual small cubes. If you'd like to make it again, you'll find it in PDF format here.
Wishing you a lovely Sunday, food lovers!
Karin
P.S.: All the equipment used can be found at the bottom of the recipe.


Related posts
 Juicy Matcha Muffins with Pecan Nuts & White Chocolate
Matcha Iced Latte & Coconut Variant
Pull-apart bread with fresh wild garlic pesto
Mini Banana Bread with Chocolate Chips
Juicy Matcha Muffins with Pecan Nuts & White Chocolate
Matcha Iced Latte & Coconut Variant
Pull-apart bread with fresh wild garlic pesto
Mini Banana Bread with Chocolate Chips
Leave a comment
Comments
Question de Elena
By: Elena K. On 2021-02-08Guten Tag
Könnten Sie mir bitte den Volumen (je Kavität) der von Ihnen verwendeten Backform Pixcake / Pixmoule von Silikomart mitteilen?
Vielen Dank.
Beste Grüsse
E. Klaiber
Replied by: Veronique N. On 2021-02-08
Replied by: Elena K. On 2021-02-08
Replied by: Elena K. On 2021-02-08
Question de Charlotte
By: Charlotte M. On 2020-05-21Bonjour. Merci pour ces recettes délicieuses. Je trouve juste qu'il manque les temps de décongelation pour les entremets. Je sais que c'est environ 6h pour un grand mais pour des plus petit?
Replied by: Karin On 2020-05-22