
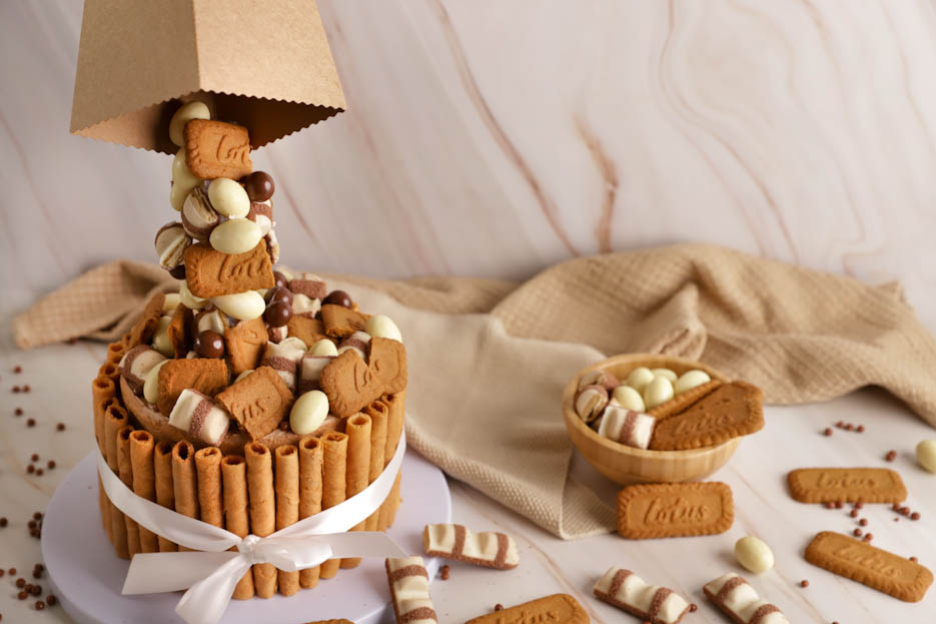
Gravity cake
Hello food lovers!
We know how much kids and adults love chocolate-based recipes!
This week, we're sharing an ultra indulgent recipe: a Gravity cake with whipped milk chocolate ganache and speculoos.
You've probably already seen this type of cake decorated with M&M'S or Maltesers... At Cakelicious, we decided to innovate by using white Kinder Bueno, white Schoko-Bons and speculoos.
Gravity cakes will hold no more secrets for you! ;-)

Here are the ingredients to make this Gravity cake for 8 to 10 people:
Whipped milk chocolate ganache
- 3gr powdered gelatin
- 15gr water
- 405gr heavy cream
- 180gr milk chocolate
- 6 eggs
- 150gr sugar
- 1 tsp speculoos flavoring
- 150gr flour
- 70gr water
- 30gr sugar
- Gravity cake structure
- 1 jar of crunchy speculoos filling
- 6 tbsp speculoos crumbs
- Lace cigarette biscuits
- Decorative ribbon
- 1 kraft popcorn box
- 1 white chocolate pen
- 1 cooling spray
- White Schoko-Bons
- White Kinder Bueno
- Speculoos
- Milk chocolate pearls
First of all, we'll make the base of the whipped ganache as it will need to cool overnight in the fridge.
Whipped milk chocolate ganache
Start by weighing 3gr of powdered gelatin, pour it into 15gr of very cold water, mix and set aside.
Use a precision scale spoon to be accurate.


In a saucepan, bring 405gr of heavy cream to a boil.
Remove the cream from the heat, add the gelatin/water mixture and mix well until it melts.


Pour the cream/gelatin mixture in 3 additions over 180gr of milk chocolate.
Mix well with a whisk between each addition.


Then blend everything together to get a smooth, even mixture.
Cover the ganache with cling film touching the surface. The cling film must touch the mixture to prevent a skin from forming on top.
Place the mixture in the fridge overnight before whipping it.
It is very important to respect the cooling times, otherwise the ganache may split when you whip it.


We can now prepare the sponge cake.
Sponge cake
Preheat your oven to 150°C fan-assisted.
Crack 6 eggs and separate the whites from the yolks.


Whisk 150gr of sugar with the egg whites at maximum speed.
It is completely normal if this step takes a little time. Indeed, it will depend on your mixer and the temperature of the eggs.
I recommend using eggs at room temperature. This way, the eggs will whip up faster.
The meringue must be whipped very, very stiffly! This is important, because if you don't whip it enough, it will collapse when you add the egg yolks.


Add 1 tsp of speculoos flavoring to lightly flavor the sponge cake. Use measuring spoons.
Now pour in the 6 egg yolks one by one while whisking at minimum speed.
It's very important not to whisk too fast, otherwise the meringue will collapse.


And there you have it, a beautiful meringue that's still very stiff!
All that's left is to add the flour. To do so, pour 150gr of flour into a sieve.
Sift the flour over the meringue to avoid lumps in the sponge cake.


Gently fold the sponge batter with a spatula until you get a smooth, even mixture.
You can also do this step with the flat beater attachment by mixing at minimum speed for 10 seconds.
The batter is ready!
Prepare a mould of 15 cm in diameter and 10 cm high. Spray it with release spray to get a perfect sponge cake that won't stick when unmoulding.
Pour the batter into your mould and bake for 45-55 minutes in the middle of the oven preheated to 150°C.
Never open the oven before 45 minutes of baking as your sponge cake may collapse.


After 45 minutes, check the doneness by inserting a knife into the center of the sponge cake. If the blade comes out clean, the sponge cake is done! If not, extend the baking time by 5 minutes.
Once baked, immediately unmould the sponge cake by turning the mould upside down onto a cooling rack. This is where the magic of the release spray works — a 100% successful unmoulding! :-)
Let the sponge cake cool completely before cutting and filling it.
If you make it in advance, it will keep for 2 days well wrapped at room temperature.
It can also be frozen for 2 months when well wrapped in cling film — and don't forget to take it out at least 2 hours before using it.


We're now going to make a syrup to soak the sponge cake during assembly.
Soaking syrup
In a saucepan, pour 70gr of water and 30gr of sugar.
Using a thermometer, heat everything to between 100°C and 105°C.


Pour the syrup into a bowl and let it cool in the fridge.
Once cooled, transfer the syrup into a soaking bottle. This little bottle is brilliant! Thanks to its cap with many small holes, the syrup will spread perfectly over the sponge cake.


Once all the preparations are ready and cooled, we can move on to assembling and decorating the Gravity cake.
Assembly and decorations
First, take the ganache out of the fridge and whip it like whipped cream using the whisk attachment of your mixer. Be careful — it whips up quickly, so keep a close eye on it so it doesn't split.
Transfer the whipped ganache into a large piping bag and place it in the fridge for a few moments.


To assemble the cake, you will need a Gravity cake structure support.
To begin, we'll do a little DIY to assemble the support.
Plug the 4 small holes using the white pieces (as shown in the third photo below). The center must remain empty — that's where the plastic rod will go.


Then fix the base and mount the plastic rod. In the second photo below, you can see that the last piece is bent — remove it.
We can put it back once the cake is filled.


Make a small notch with a knife on the side of the sponge cake — this will make it easier to align the layers during assembly.
Thread the sponge cake through the plastic rod, making sure to center it properly.


Remove the sponge cake from the structure and cut it with a leveler set to 2 cm. We need 4 discs.
This tool is magical for cutting sponge cakes into equal layers.


Place a first sponge disc on the support and soak it with syrup.
The syrup will add moisture to the sponge cake and thanks to this little bottle, it will be distributed evenly.


Then spread 2 tbsp of crunchy speculoos filling using a small offset spatula.
This filling is absolutely delicious and will add a lot of indulgence to the cake.


Pipe 1/4 of the chocolate ganache per layer and smooth it with a small offset spatula.


For even more indulgence, sprinkle the equivalent of 2 tbsp of speculoos crumbs over the ganache.


Continue building the layers: soak the sponge cake with syrup then spread the crunchy speculoos filling. Place this sponge layer on top of the previous one.
The notch made at the beginning of the assembly will be useful at this stage. The goal is to correctly align the discs using this reference point, ensuring a perfectly straight cake.


Pipe the whipped ganache and don't forget the speculoos crumbs. Then repeat this step one last time.
Note that the last layer does not need to be soaked or filled.


Pipe the remaining whipped ganache on top of the cake and on the sides.
Smooth your cake using an offset spatula.


If it's not perfectly smooth, don't worry! Everything will be covered afterwards. ;-)
Reattach the last piece of the Gravity cake support that was removed earlier.


Arrange lace cigarette biscuits, similar to those used to decorate ice cream sundaes in restaurants, nicely all around the cake. You'll find them at Aligro. ;-)


To hold them in place, tie them with a pretty ribbon.
To create the effect of a tipped-over box of chocolates, attach a kraft popcorn box to the last piece of the Gravity cake support. To do this, use a hot glue gun to hold the box in place.
If you don't have a glue gun, you can use a white chocolate pen — it works too. :-) However, make sure to apply enough chocolate so that the box holds well. :-)


To make a Gravity cake, using a cooling spray is essential to fix the chocolates and biscuits directly onto the rod.
Now, heat some water and pour it into a jug. Submerge a white chocolate pen in it for 10 minutes. This will be used to stick the chocolates and biscuits.


Take your time with this step as it requires patience and precision.
For this cake, we chose to decorate it with white Schoko-Bons, white Kinder Bueno and speculoos.
Take the white chocolate pen and apply enough melted chocolate onto the biscuits and chocolates.
Press them onto the support rod while using the cooling spray to instantly set the chocolate and stick the elements. Do them one by one.


Discover our technique in video:
Finish by adding a few milk chocolate pearls.
Fill the top of the cake with chocolates and speculoos for an even more indulgent effect.


And there you have it — a magnificent Gravity cake, perfect for a birthday party! :-)
It will keep for 2 days in the fridge well wrapped.
I recommend preparing this cake over 2 days.
Day -1: The base of the whipped ganache, the sponge cake and the soaking syrup.
Day of: The assembly and decorations.
I hope you'll love this cake!
Wishing you a wonderful Sunday, food lovers.
Sophie
P.S.: All the materials used can be found at the bottom of the recipe.


Related posts
 Juicy Matcha Muffins with Pecan Nuts & White Chocolate
Matcha Iced Latte & Coconut Variant
Pull-apart bread with fresh wild garlic pesto
Mini Banana Bread with Chocolate Chips
Juicy Matcha Muffins with Pecan Nuts & White Chocolate
Matcha Iced Latte & Coconut Variant
Pull-apart bread with fresh wild garlic pesto
Mini Banana Bread with Chocolate Chips
Leave a comment
Comments
Question de Moira
By: Moira P. On 2024-11-12Bonjour, ça a l’air délicieux! À la place de la gélatine en poudre, du agar-agar c’est bien aussi? Même quantité? Et si je voudrais changer l’aspect du pourtour et mettre une ganache pour la décoration, vous me conseillez laquelle? Merci beaucoup ?
Replied by: Karin On 2024-11-12
Question de Tamara
By: Tamara P. On 2024-10-19Bonjour,
Après avoir monté le gâteau, faut-il le laisser dans le frigo ou peut-on le laisser dehors ?
Replied by: Karin On 2024-10-21