
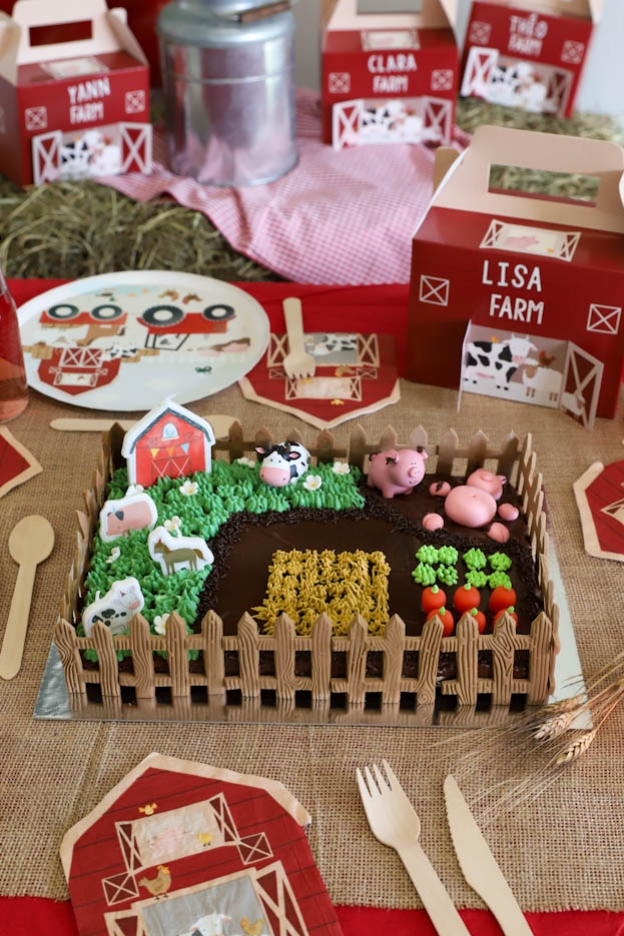
Farm Cake
Hello sweet tooths,
Is your child asking for a farm-themed cake for their birthday and you're out of ideas?
This recipe is made for you! It's easy to make and you can let your imagination run wild to create a lovely farm. :-)
Let's get started with a chocolate cake decorated with a garden, a pig mud pool and a paddock, all surrounded by pretty fences.

To make this cake for approximately 12 to 15 people, you will need:
- 3 eggs
- 250gr sugar
- 2 tsp vanilla extract
- 2 tbsp unsweetened cocoa powder
- 300gr milk
- 300gr flour
- 2 tsp baking powder
- 200gr butter
Decorations
- Whipped cream topping
- Sugar vermicelli "chocolate"
- 40 cm piping bags
- 1 pack of "Sweet Pink" fondant
- Modelling sticks
- Edible glue
- 1 pack of shiny gold fondant
- Fence cutter
- Wood impression mat
- Small rolling pin
- Magic rolling powder
- 1 pack of orange marzipan
- 1/4 jar of chocolate ganache
- Farm animal toppers set (pig)
- Fondant pig
- Light green gel food colouring
- Golden honey gel food colouring
- 1/2 jar of chocolate ganache
- Multi-opening piping tip N°233
- Leaf piping tip N° 74
- Marzipan carrots
- Leaf green gel food colouring
- Farm animal toppers set (cow)
- Farm animal candles
- Small white sugar flowers
- Multi-opening piping tip N°233
First of all, we'll start with the fondant and marzipan decorations so they can dry for a minimum of 2 hours.
Fondant Pig
Grab a pack of "Sweet Pink" fondant and weigh out the pig parts as follows:
- 1x 20gr for the body
- 1x 10gr for the head
- 4x 4gr for the feet
- 3x 2gr for the ears and snout
We'll start by shaping the pig's body.


Knead your fondant between your hands to make it more elastic and smooth.
Form a nice ball and flatten it slightly with the palm of your hand.


Do the same for the pig's head.


Now, shape the pig's feet. To do this, form 4 small balls and flatten them slightly with your finger.


Now it's time for the ears. Start by making 2 balls, then using your fingertips, shape them into 2 small teardrop shapes.


Finally, make the snout by shaping a small ball.
There we go, the pig can now be assembled. :-)
To keep the pieces together, use edible glue. This glue is great and has a built-in small brush which is super handy.
Warning! The less glue you use, the better. Apply just a dot of glue in the centre of the pig's head.


Place the snout on the glue and press gently to attach it and flatten it slightly.
Then, apply a dot of glue to the ears and place them on top of the pig's head.


Using a modelling stick or a toothpick, create the eyes and nostrils.


Still using the modelling stick, add its belly button.
Finally, grab a knife and make a small notch in each foot for a more realistic effect.
The pig is done! Set it aside at room temperature until it's time to decorate.
Use the video below to help you make it more easily.
You will have some fondant left over. Wrap it in cling film + a zip-lock bag and store it in an airtight container, away from light. It should be used within 10 days. Alternatively, you can vacuum-seal the fondant and it will keep for one month. :-)


Now, we're going to make the fences that will go all around the cake.
Fondant Fences
To create the fences, you will need shiny gold fondant.
Use our video to help you make these fences.
Take about 1/4 of the pack of fondant and knead it well between your hands to make it smooth and elastic.
To prevent the fondant from sticking to the work surface, dust it with magic rolling powder.


Place the fondant on the work surface, then roll it out using a small rolling pin.
This rolling pin comes with guides; you can use the purple ones to make the fences.
If you don't have a rolling pin with guides, no problem — simply roll out the fondant to about 2-3 mm thick. :-)


For a more realistic look, we'll use an impression mat to give the fences a wood effect.
Place it on the fondant and press down.
Press firmly all over so that the fondant is fully imprinted.


Cut out the fences using the fence cutter. For this cake, you will need 18.
Once all the fences are cut out, place them on baking paper.
They will also need to dry for 2 hours at room temperature so they can hold their shape.


Now, we're going to make the little marzipan carrots that will go in the garden.
Marzipan Carrots
Start by weighing out 6 pieces of orange marzipan of about 5gr each.
Form a nice ball, then roll it between your hands, tapering one side slightly to get a nice carrot shape.


Cut off the thinner end of the carrot with a knife.
Make small notches using the back of your knife to give the carrots a realistic look.
Place them on baking paper and set them aside until it's time to decorate.
You will have some marzipan left over. You can wrap what's left in cling film + a zip-lock bag and store the whole thing in an airtight container, away from light.


Now that all the fondant and marzipan decorations are ready, we can prepare the chocolate cake. :-)
Chocolate Cake
Preheat your oven to 180°C fan-assisted.
Melt 200gr of butter in the microwave at 600Watt for 30 seconds. If it's not completely melted, put it back in for a few seconds until fully melted.


In a large bowl, crack 3 eggs, then add 250gr of sugar.
Whisk the eggs with the sugar at maximum speed for about 10 minutes until the mixture becomes foamy.


Grab your measuring spoons and add 2 tsp of vanilla extract.


Add 2 tbsp of unsweetened cocoa powder and 300gr of milk.


Mix for a few seconds on low speed.
Add 300gr of flour.


Add 2 tsp of baking powder, again using your measuring spoons.
Mix again on low speed.


Pour in the melted butter and mix again for 30 seconds at medium speed.
The cake batter is now ready.


For this cake, we used a rectangular tin (33 x 22 cm).
To help it unmould easily, spray it with non-stick baking spray.


Pour in the cake batter and bake for 25 minutes in the middle of the preheated oven.
Check the baking with a knife. If the blade comes out dry, the cake is done. However, if batter sticks to the blade when you pull it out, put the cake back in the oven for a few more minutes.
Once baked, let it cool completely before unmoulding.
Once the cake has cooled, unmould it onto a board.


Now let's move on to decorating the cake. This is my favourite part ;-) Let your creativity run wild!
Decorations
First, we'll prepare the whipped cream topping that we'll use to create the garden and the paddock grass.
Don't know the whipped cream topping? It's a light and creamy ready-to-use cream. It has the perfect consistency for decorating cakes.
In a bowl, pour 75gr of whipped cream topping and 100gr of very cold water.


Using the whisk attachment at medium speed, whip the cream for about 5 minutes.
You should achieve a consistency close to that of meringue.
Divide the whipped cream into 3 bowls.


The first bowl will be for the wheat field. Add a few drops of "golden honey" gel food colouring, then mix with a spoon.
To achieve the desired colour, add the colouring gradually! ;-)


Next, we'll colour our second bowl of whipped cream.
To do this, use the leaf green gel food colouring. Add the colouring little by little to get as close as possible to the colour of grass.


For the last bowl, we'll colour the cream with the light green gel food colouring. We'll use it to make the lettuces and the carrot tops.
There we go, the 3 colours are ready! :-)


Pig Mud Pool
To make the pig mud pool, grab the chocolate ganache from Funcakes.
Yes, I chose the easy option by using ready-made ganache. :-) It's fantastic for this type of preparation!
Simply heat it in the microwave at 340Watt for about 1 minute and mix well.
Pour a little ganache into one corner of the cake.
Using a small offset spatula, spread the ganache to create the mud pool for the pigs. ;-)


Then place the fondant pig made at the beginning of the recipe.
I also used the pig from the farm animal toppers set.


Garden
For the garden area, pour some chocolate ganache and spread it, again using a small offset spatula.
Place the 6 marzipan carrots made earlier.


For the garden lettuces, grab the multi-opening piping tip N°233.
Place it in a piping bag and fill it with whipped cream (light green colour).
Pipe 8 lettuces next to the carrots.


For the wheat field, you will need the multi-opening piping tip N°233.
Place the tip in a piping bag, then fill it with whipped cream (golden honey colour).
Pipe the wheat field next to the garden.


Paddock
To make the paddock grass, you will need the multi-opening piping tip N°233.
Place the tip in a piping bag, then fill it with whipped cream (leaf green colour).
Pipe the grass over the rest of the cake.


Using the leaf piping tip N° 74 and the whipped cream (light green colour) used for the lettuces, pipe the carrot tops.


Looking at my cake, I felt my pigs were too clean. ;-)
Add a little ganache to the mud pool, on the pigs' ears and feet.
Separate the different areas of the farm using chocolate sugar vermicelli.


Place the cow from the farm animal cake toppers set in the grass.
In our range, we have lovely farm animal candles.


Place the candles in the grassy area of the cake and add a few small white sugar flowers.
We'll now place the fences all around our cake.
I recommend putting them on no more than 2 hours before serving the cake, as they may start to sag.
Using a brush, apply chocolate ganache all around the cake. This way, the fences will adhere well to the cake. :-)


Place the fences around the cake. You'll find that in some places the fences are a little too long... Simply cut off one post with a knife to get the right size to complete the exact perimeter.
Once the decoration is complete, slide your cake into a box and store it in a cool, dry place until it's time to serve. Do not put it in the fridge, as the fondant may melt.


There you have it, the farm-themed cake is ready to be enjoyed.
Don't forget to browse our farm birthday category. You'll find everything you need to create a wonderful farm-themed decoration! :-D
I hope you enjoy this recipe and give this cake a try. You'll definitely make people happy! :-)
Have a lovely Sunday!
Sophie
P.S.: All the materials used can be found at the bottom of the recipe.


Related posts
 Juicy Matcha Muffins with Pecan Nuts & White Chocolate
Matcha Iced Latte & Coconut Variant
Pull-apart bread with fresh wild garlic pesto
Mini Banana Bread with Chocolate Chips
Juicy Matcha Muffins with Pecan Nuts & White Chocolate
Matcha Iced Latte & Coconut Variant
Pull-apart bread with fresh wild garlic pesto
Mini Banana Bread with Chocolate Chips
Leave a comment
Comments
Réponse à est-ce
By: Sandra R. On 2025-03-01que ce gâteau je peux fourrer d' une mousse à l'intérieur ou que me conseillez-vous?
Je recherche
un gâteau de préférence rectangulaire genoise et mousse
Merci
Replied by: Karin On 2025-03-03
Question de Gaëlle
By: Gaëlle M. On 2025-01-07Bonjour! Est-il possible de faire le gâteau sur 3 jours? Un jour le gâteau au chocolat, le lendemain tout ce qui est décor puis le manger le 3 ème jours? Au frigo les décoration tiennent ? Merci pour votre retour
Replied by: Karin On 2025-01-07
Question de Sophie
By: Sophie J. On 2024-09-11Bonjour,
Petite question, la vache et le cochon proviennent bien du set de cake toppers animaux de la ferme"? Car dans. la description de ce set c'est uniquement marqué qu'il contient 12 cake toppers en carton."