
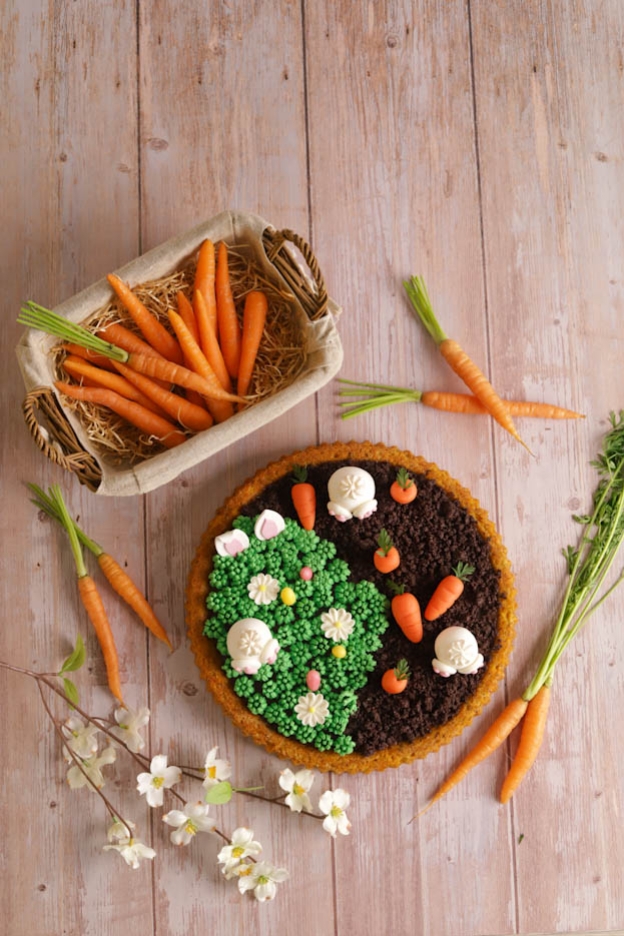
Easter Chocolate-Carrot Dessert
Hello food lovers,
Easter is just around the corner! It's the season for chocolate and carrot cakes.
For this recipe, I mixed these two Easter classics to offer you a carrot dessert with a chocolate ganache, decorated like a little garden.
This recipe can be made with the help of your children, they'll have a blast making the marzipan and sugar paste decorations. :-)

To make this little garden in the 28 cm upside-down tart tin, you will need:
Carrot cake
- 250gr carrots (trimmed and peeled)
- 2 eggs
- 70gr brown sugar
- 60gr ground hazelnuts
- 70gr ground almonds
- 10gr baking powder
- 50gr flour
- 30gr butter
- 1 pinch of salt
- 1/2 tsp ground cinnamon
Cocoa crumble
- 30gr flour
- 15gr unsweetened cocoa powder
- 15gr sweetened cocoa powder (Nesquik or Caotina)
- 50gr butter
- 30gr sugar
Chocolate ganache
- 125gr milk chocolate
- 60gr dark chocolate
- 110gr heavy cream
- 10gr butter
Decorations
- 1 packet of orange marzipan
- 1 packet of white sugar paste
- 2 packets of Easter sugar decorations
- Edible glue
- 50gr magic cream
- Light green gel food colouring
- Leaf green gel food colouring
- Multi-opening piping tip N°233
- 40 cm piping bag
- Sugar daisy flowers
- Small sugar eggs
- A few carrot tops or some parsley
Carrot cake
I was inspired by pastry chef Pierre Hermé's carrot cake recipe, changing a few small details. ;-)
Start by cutting the ends off the carrots and peeling them.


In total, we will need 250gr, so weigh them before grating.
Grate the carrots using the finest side of your grater.
Set the grated carrots aside in a bowl while we prepare the rest.


In a bowl, crack 2 eggs and add 70gr of brown sugar.
Whisk together until the mixture turns pale.


Meanwhile, melt 30gr of butter in the microwave at 600Watt for about 30 seconds.
Preheat the oven to 180°C, fan-assisted.
The egg/sugar mixture has now turned nicely pale.


Add 60gr of ground hazelnuts, 70gr of ground almonds and a pinch of salt.


Measure 1/2 tsp of ground cinnamon, using measuring spoons.
Mix again with the whisk, just 30 seconds at max speed.


Once the mixture is well combined, add 10gr of baking powder. Use the scale spoon to be precise with the weighing.


Fold in 50gr of flour, mixing with a spatula until you have a smooth, homogeneous batter.


Add the previously melted butter and mix again.


Add the grated carrots and mix well.
Our cake batter is now ready.


Now let's prepare the tart tin. Here, I used the 28 cm upside-down tart tin, which I think is super great. We already have a few recipes made with this tin, such as the strawberry-rhubarb tart and the blueberry-passion fruit tart.
Thanks to this tin, we can create a cake base and then fill it – as here with a chocolate ganache – but you could also pour in a diplomat cream or a creamy filling, according to your preferences! ;-)


To ensure our cake unmolds well, spray the tin with release spray.
This spray is great – no need for flour or butter, so it saves you time in your preparations. ;-P


Pour the cake batter into the tin.
Use the spatula to spread the batter evenly.
Bake for 20 minutes in the middle of the preheated oven.


Our cake is baked. Let it cool completely before unmolding. This is extremely important, otherwise it risks breaking!
Once the cake is completely cool, unmold it onto a plate or a tray.


Cocoa crumble
To give our garden an earthy effect, we will prepare a cocoa crumble.
In a bowl, pour 50gr of very cold butter and 15gr of unsweetened cocoa powder.


Add 15gr of sweetened cocoa such as Nesquik or Caotina.
It is important to mix the two types of cocoa, because if you only use unsweetened cocoa, the crumble will be too bitter. On the other hand, if you only use sweetened cocoa, the crumble will be far too sweet.
Add 30gr of flour and 30gr of sugar.
Preheat your oven to 180°C, fan-assisted.


Line a perforated baking tray with parchment paper.
Using your fingertips, rub the ingredients together to form a crumble.


As in my first photo, it is important that there are still some chunks in your crumble.
Spread the crumble on the tray and bake for 8 minutes in the middle of the preheated oven.
When it comes out of the oven, mix it well with a spatula to obtain a fine crumble.
Let it cool on the tray at room temperature.


Chocolate ganache
In a bowl, mix 125gr of milk chocolate and 60gr of dark chocolate.
Place the bowl in the microwave for one minute at 600Watt. The chocolate will start to melt but won't be fully melted. That's fine, set it aside while we heat the cream.


In a saucepan, bring 110gr of heavy cream to the boil.


We will pour the hot cream over the chocolate in 3 additions to obtain a beautiful ganache.
Pour a portion of the cream, whisk, then repeat this step 2 more times.


We now have a beautiful smooth ganache. Add 10gr of butter in pieces.
Mix well so that all the butter melts and is fully incorporated into the ganache.


Pour the ganache into the base of the cake and spread it with a small offset spatula.
Place the cake in the fridge while preparing the decorations.


Decorations
We will start by making the little carrots. 3 whole ones and 3 with the tip cut off to look as if they are planted in the soil – but you'll see that when we decorate the cake. ;-)
Start by weighing 3 pieces of orange marzipan of about 8gr each to create the whole carrots.
Form a nice ball, then roll it between your hands, slightly tapering one end of the ball to get a lovely carrot shape.


To give them a realistic effect, use the back of a knife and press gently to make marks like on real carrots.


Using a toothpick, make a small hole so you can place a carrot top in it.
I recommend adding the carrot tops at the last moment so they stay looking nice.
If you don't have carrot tops, use a sprig of parsley.


Now we will make the carrots with the tip cut off.
Proceed in the same way as for the whole carrots.
Weigh 3 pieces of orange marzipan of about 8gr each, form a ball, then shape it into a carrot between your hands.


Cut off the pointed end of the carrot.
Use the back of your knife again to give the carrots a realistic effect.


Just like with the previous carrots, make a small hole with a toothpick so you can place a carrot top or a sprig of parsley in it.


We will also make 3 little bunny bottoms.
Start by weighing 3 pieces of white sugar paste of about 20gr.
In your hands, form 3 nice balls.
To make the little bunny bottoms easier to create, I chose to use 2 packets of Easter sugar decorations which contain paws and tails.


To make sure the decorations hold well, attach them with a little edible glue.
Place the bunny's tail and paws on the sugar paste ball.


Our marzipan and sugar paste decorations are ready.


Here is a video showing you how to create these decorations.
You will have some marzipan and sugar paste left over. You can wrap the remainder in cling film + a zip-lock bag and store it all in a Tupperware container, away from light.
Now there is one last step before creating our little garden: the grass made from magic cream. You don't know magic cream? It's a light and creamy ready-to-use cream. It has the perfect consistency for decorating cakes. :-)
In a bowl, pour 50gr of magic cream and 66gr of very cold water.
Colour the magic cream by adding a little light green gel food colouring.


Using a whisk at medium speed, whip the magic cream for about 5 minutes.
You need to achieve a consistency close to that of meringue.
Once the magic cream is whipped, add a few drops of leaf green gel food colouring. Add it gradually to achieve the desired colour. Try to get as close as possible to the colour of grass.


To create the grass effect, use the multi-opening piping tip N°233.
Place it in a 40 cm piping bag.


Cut the tip of the bag with scissors to insert the piping tip and fill the bag with the green magic cream.
To fill the bag neatly, open it up inside a pitcher.


All our decorations are ready! Let's have some fun! :-)
Start by spreading the crumble over part of the tart.
Then pipe the green magic cream to make the grass.


Pipe the grass on the part where there is no crumble.
I placed the marzipan carrots on the soil side and arranged the little bunny bottoms on both the soil and grass sides. Of course, you place your decorations wherever you like! ;-)
In the packets of Easter sugar decorations, you will also find ears that you can insert into the grass.


Look at these pretty little sugar daisies! Place them on the grass and also arrange a few small sugar eggs.


And there you have it, a beautiful Easter garden with carrots and chocolate.
This dessert will keep well wrapped in a box for about 2 days in the fridge.
I hope your children will love this recipe – they'll have so much fun creating this little garden.
I wish you a lovely Sunday and a wonderful Easter. :-D
Sophie
P.S.: All the equipment can be found at the bottom of the recipe.


Related posts
 Juicy Matcha Muffins with Pecan Nuts & White Chocolate
Matcha Iced Latte & Coconut Variant
Pull-apart bread with fresh wild garlic pesto
Mini Banana Bread with Chocolate Chips
Juicy Matcha Muffins with Pecan Nuts & White Chocolate
Matcha Iced Latte & Coconut Variant
Pull-apart bread with fresh wild garlic pesto
Mini Banana Bread with Chocolate Chips
Leave a comment
Comments
Question de Karine
By: Karine M. On 2025-03-24Bonjour,
Pour combien de personnes est prévu ce gâteau?
Meilleures salutations et bonne soirée.
Replied by: Karin On 2025-03-25
Réponse à Karin
By: Karin On 2024-03-18Nous n'avons jamais testé de créer un espace de cette façon. En revanche pour le créer nous vous conseillons plutôt de creuser votre gâteau rectangle une fois cuit et refroidi, de cette manière vous pourrez couler votre ganache. Sinon laissez-vous tenter par notre moule, nous avons plusieurs recettes gourmandes avec celui-ci ;-) Belle journée et bonne pâtisserie.
Question de Vanessa
By: Vanessa L. On 2024-03-12Bonjour, si on ne trouve pas la colle alimentaire.. peut on coller autrement ?
Merci d'avance
Replied by: Karin On 2024-03-13
Question de Elodie
By: Elodie S. On 2023-04-01Bonjour, peut-on préparer le biscuit avec la ganache dessus la veille, si oui je le laisse au frigo ? et le jour J mettre le crumble et le reste de la décoration. Merci d'avance
Replied by: Laura On 2023-04-01