
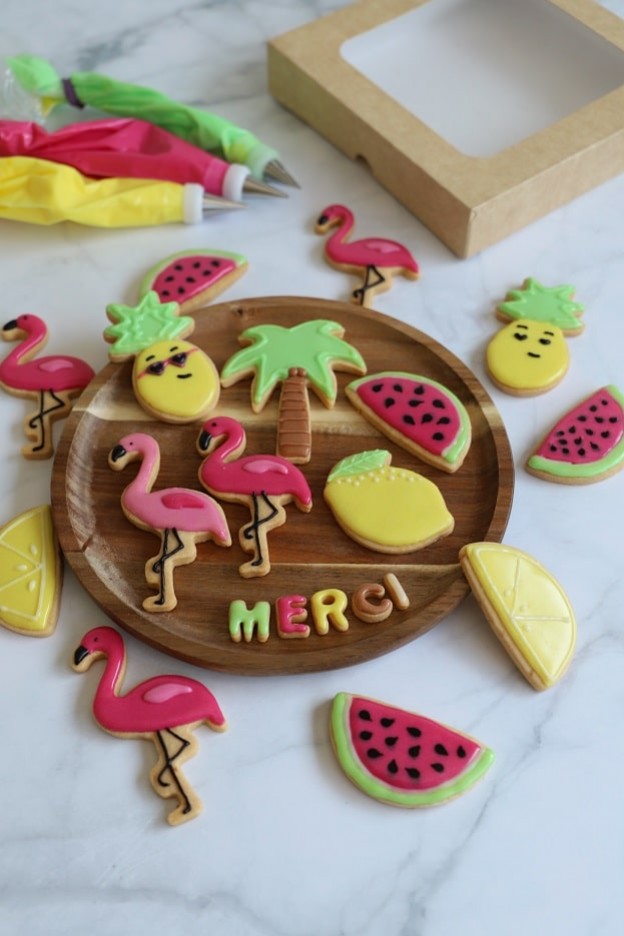
Decorated Cookies with Royal Icing
Hey foodies!
This week I treated myself by decorating cookies with royal icing. :o)
A technique that intimidates a lot of people... But I hope that with this video tutorial you'll take on this lovely challenge, which in the end, isn't that difficult.
So here are my summer-themed cookies. A great end-of-year gift idea for your children's teachers!

Here are the ingredients and equipment to make 40 cookies of 7 cm:
- 250gr of softened butter
- 150gr of powdered sugar
- the zest of one lemon
- 1 egg
- 1/2 tsp of salt
- 450gr of flour
- 2 packets of royal icing mix (900gr total)
Required equipment:
- Gel food coloring
- 30 cm piping bags
- 6-7 x 1 mm piping tips
- Elastic bands for piping bags
- 6-7 mini piping tip couplers (essential for working with royal icing)
- 1 bottle filled with water
- 1 scribe needle
- Cookie cutters of your choice
Start by pouring 250gr of softened butter into your bowl with 150gr of powdered sugar. Also zest one lemon using a microplane grater.
It is essential to use powdered sugar so that your cookies are as smooth as possible. No granulated sugar!


Mix everything with the K beater for 2 minutes, until you get a nice creamy texture.
Then add 1 egg and 1/2 teaspoon of salt.


Mix again with the K beater for 1-2 minutes. This time you'll get a slightly grainy mixture.
Finally, add 450gr of flour and mix, still with the K beater but for just a few seconds.


When you get a mixture like my image N°1, stop the mixer.
And finish mixing the dough by hand! The electric mixer would develop the gluten too much. And you'd get bubbles on the surface of your cookies if you mix your shortbread dough too long.
That's why it's important to finish the dough by hand and mix it as little as possible.
Simply form a ball using a dough scraper.


Use 5 mm guide sticks and roll out your dough between two sheets of parchment paper with a large rolling pin.
Then place your rolled-out dough in the freezer for 15-20 minutes. This way the dough will be much easier to work with.


Your dough is now nice and cold. It's time to preheat your oven to 135°C fan-assisted.
For my "summer" cookies, I used 3 sets. The flamingo and palm tree set from Decora, the fruit set from Wilton, and the alphabet cookie cutters from Decora.
Note that the alphabet cutters are small and not easy to unmold... It's doable but quite technical.


Cut out your shapes and place them on a perforated baking tray lined with parchment paper or a perforated baking mat.
Then bake your cookies in your preheated oven for 40 minutes. Your cookies will lightly color around the edges.
This will give you approximately 40 cookies (depending on the size of your cookies). So 2 batches of 2 trays. Don't hesitate to pack the cookies closely on your tray. They barely rise during baking.
Once baked, let them cool completely.


Royal Icing Decoration
Let's get decorating!
For this you will need:
- 2 packets of royal icing mix (900gr total)
- Gel food coloring (here I used yellow, pink, green, brown, black)
- 6-7 x 30 cm piping bags
- 6-7 x 1 mm piping tips
- Elastic bands for piping bags
- 6-7 mini piping tip couplers (essential for working with royal icing)
- 1 bottle filled with water
- 1 scribe needle
In a mixing bowl, pour 900gr of royal icing powder, then add 110gr of water.
If you'd like to make your royal icing from scratch, you can follow the recipe here: RECIPE


Mix at minimum speed for 1-2 minutes with the K beater.
You'll get a fairly thick icing. That's perfect.
Divide the icing into small bowls as follows:
200gr for yellow
200gr for green
140g for light pink
140gr for fuchsia pink
140gr for brown
80gr for black
80gr for white


Add a tiny bit of gel food coloring to your icings and a tiny bit of water. I always use a bottle to measure the water carefully.
Mix with a spoon and adjust the color and consistency as you go (you'll see the details in my video later).


I'll show you the rest in the video so it's more visual and easy to understand. :o)
If you prefer to see the photos, you'll find them in this recipe here: RECIPE
Very important points about royal icing:
The icing is ready when it flows in a ribbon (see my video). If you're not sure, shake your bowl — if everything becomes smooth it's ready.
Always place a damp cloth over your piping tips so they don't clog.
Dry your cookies in a dehydrator or in the oven at 40°C, top and bottom heat between each step. This way the decorations won't sink and will stay nicely 3D. It also keeps your cookies nice and shiny.
Use 1 mm piping tips.
It is highly recommended to use piping tip couplers so you can change tips during decoration and above all not lose your tip in the icing.


A wonderful end-of-year gift for your children's teacher. I used these lovely boxes to gift my cookies.
I hope you'll enjoy this video recipe. :o)
The cookies keep for several weeks in a cardboard or metal tin.
Happy Sunday, foodies.
Karin
PS: All the equipment used can be found at the bottom of the recipe.
Other piping tips can also be used for royal icing decoration.


Related posts
 Juicy Matcha Muffins with Pecan Nuts & White Chocolate
Matcha Iced Latte & Coconut Variant
Pull-apart bread with fresh wild garlic pesto
Mini Banana Bread with Chocolate Chips
Juicy Matcha Muffins with Pecan Nuts & White Chocolate
Matcha Iced Latte & Coconut Variant
Pull-apart bread with fresh wild garlic pesto
Mini Banana Bread with Chocolate Chips
Leave a comment
Comments
Question de Céline
By: Céline V. On 2024-03-25Bonjour,
Est-ce qu'il est possible de remplacer l'eau par du jus de citron pour donner plus de pep's?
Merci d'avance et belle journée
Replied by: Karin On 2024-03-26
Question de Tiffany
By: Tiffany D. On 2023-09-06Bonjour,
Je souhaite faire votre recette pour une déco de confirmation.
Combien de temps les biscuits peuvent être conserver avec le glacage?
Merci d avance pour votre réponse
Replied by: Karin On 2023-09-06
Question de Maeva
By: Maeva S. On 2022-11-08Bonjour,
J’ai fait de grands biscuits pour les décorer le lendemain certains avaient fendus au milieu mais pas le jour même. Savez-vous la raison de cela?
Merci d’avance
Cordialement
Replied by: Laura On 2022-11-08
Replied by: Maeva S. On 2022-11-09
Replied by: Laura On 2022-11-11
Question de Aurélie
By: Aurélie G. On 2022-05-10Bonsoir, est il possible de préparer les biscuits à l'avance et les congeler ?
Merci et bonne soirée
Aurélie
Replied by: Karin On 2022-05-11
Question de Sonia
By: Sonia C. On 2022-04-28Bonjour! Peut-on laisser sécher la glace royale à l'air libre aussi? Si oui combien de temps faut-il jusqu'à durcissement complet? Et si l'on choisir le four, combien de temps faut-il? Merci d'avance!
Replied by: Karin On 2022-04-28
Question de Aurélie
By: Aurélie C. On 2022-03-07Bonsoir,
Après les pauses de séchage pouvons-nous ranger les biscuits les uns par dessus les autres dans une boîte ou la déco va se coller aux autres biscuits ?
Replied by: Laura On 2022-03-08