
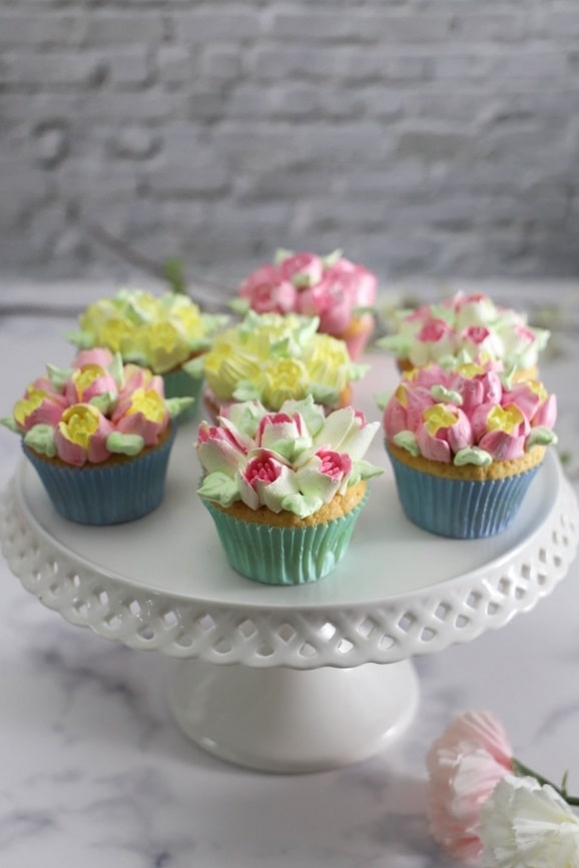
Cupcakes with Russian Piping Tips
Hello sweet tooths,
Russian piping tips are still on trend! :o)
People often think that all you have to do is put a tip in the piping bag and press once to get a beautiful flower... Unfortunately, it's not that simple. ;o)
But today I'm going to try to explain what a Russian piping tip is, which creams work best with them, what problems can arise and how to work with these tips as effectively as possible.

Here is the recipe for 12 cupcakes:
Vanilla cupcakes
- 200gr sugar
- 125gr butter
- 2 eggs
- 2 tsp vanilla extract
- 150gr sour cream 35%
- 180gr flour
- 1/2 tsp baking powder
- 1/2 tsp baking soda
- 1/2 tsp salt
Egg white cream
- 180gr sugar
- 180gr gelling sugar
- 120gr water
- 1 tbsp vanilla sugar
- 150gr egg whites
Vanilla cupcakes
Preheat the oven to 180°C (top/bottom heat).
Weigh 180gr of flour into a bowl, add 1/2 tsp of baking soda, 1/2 tsp of baking powder and 1/2 tsp of salt and mix everything well with a spoon.


Place 200gr of sugar, 125gr of butter and 2 eggs in a bowl.


Beat everything with a whisk until the mixture becomes lighter, then add 2 tsp of vanilla extract.


Then add 150gr of sour cream 35% and mix with a spatula. Gradually add the flour/baking powder/baking soda/salt mixture.


It is important to fold in the flour with a spatula and not with an electric mixer. If the batter is mixed too much, the gluten will develop and the cupcakes will rise too much during baking, which can give them a strange shape.


Pour the batter into a large piping bag (40 cm). To make things easier, place the bag in a jug before filling it with the batter.


Here, I used the pastel cupcake liner set. They are really great because they stay uniform and the fat does not seep through the paper once the cupcake is baked. :o)
Place the liners in a cupcake tin and fill them 3/4 full with the batter.


Bake the cupcakes for 20-25 minutes at 180°C (top/bottom heat). Once baked, place them on a wire rack to cool completely.


Egg white cream
Personally, I find that the most beautiful results are achieved with egg white cream.
This is due to the special properties of egg white cream. It is stable but flexible enough so that the different flowers have their typical rounded shapes and the leaves end in a nice point. The flowers thus have a more realistic appearance.
It is also possible to create beautiful flowers with Swiss meringue buttercream, American buttercream or enchanted cream. The latter is the simplest and quickest.
All creams have a fairly neutral taste, but you can flavour them with different extracts. Just make sure the extract is colour-neutral, otherwise the cream will also become tinted.
For the egg white cream, pour 180gr of sugar, 180gr of gelling sugar and 120gr of water into a saucepan.


Finally, add 1 tbsp of vanilla sugar.
Get yourself a thermometer — it is essential for the next step.
Now we are going to prepare a syrup which we will then incorporate into the egg whites.


At the same time, place 150gr of egg whites in a very clean, grease-free bowl.
Turn on your hob and bring the syrup to a boil at 110°C. When this temperature is reached, you can start beating the egg whites at maximum speed.
When the syrup reaches 120°C, pour it in a thin stream over the egg whites without stopping beating.


Whisk (still at maximum speed) the cream until it reaches room temperature. This can take up to 30 minutes, so give the cream enough time.
Once ready, the cream should be able to form firm, pointed peaks. The peaks should stand upright and not lean to the side.
If the cream is not at the desired temperature and you use it already, the piping will not work...


In the meantime, prepare your gel food colouring of choice, the piping bags, the Russian piping tips and a leaf tip.
To avoid cutting the piping bag too much, I recommend first placing the tip inside the bag and then cutting off the excess afterwards, because if you cut too much, there is a risk that the cream — and the tip — will come out.


Once the cream is ready, divide it into different containers. Then colour them with your gel food colouring of choice.


Fill your piping bags as you like.
To create a two-tone effect, you can first apply a little cream along the sides of the bag, then add another colour in the centre. Use a spatula for this.


When all the bags are ready, you can start piping.
Here are some tips for successfully piping flowers:
1. Don't overfill the piping bag, because if the cream stays under pressure for too long, it will become too soft to decorate the remaining cupcakes. This is due to the heat and pressure of your hands during piping.
2. Don't leave the cream at room temperature for too long — it changes consistency and can sometimes prevent you from creating beautiful flowers. If you have no other option, stir the cream well before using it or put it in the refrigerator in the meantime.
3. The opening (the tip) of the nozzle should be cleaned regularly, otherwise you risk getting flowers that are always closed and not open. To do this, simply wipe off the excess cream with a paper towel or scrape the end of the nozzle against a bowl.
4. Always hold the bag vertically when piping and press evenly.
5. The last and most important tip is to be patient and not be too hard on yourself... Piping with Russian tips is delicate and it takes a little practice to achieve beautiful flowers.
I will now show you in pictures and video how I pipe with Russian piping tips.
This tip is N°15. Personally, I always start from the centre.


I then pipe 5-6 flowers around the first one so that the entire cupcake is filled.


Finally, I pipe a few leaves using a leaf tip, here I used N°12.
It's beautiful, don't you think? :-)


Here is a short video to show you how to pipe with Russian piping tips.
Here are some other versions as well.
The first photo shows tip N°245, the second shows tip N°242.


And here is the final result! :o)
The cream keeps for 3 days in the refrigerator. The vanilla cupcakes can even be frozen for up to 3 months if they are well wrapped in an airtight container.
I wish you a lovely Sunday!
Jenny
P.S.: All the materials used can be found at the bottom of the recipe.


Related posts
 Juicy Matcha Muffins with Pecan Nuts & White Chocolate
Matcha Iced Latte & Coconut Variant
Pull-apart bread with fresh wild garlic pesto
Mini Banana Bread with Chocolate Chips
Juicy Matcha Muffins with Pecan Nuts & White Chocolate
Matcha Iced Latte & Coconut Variant
Pull-apart bread with fresh wild garlic pesto
Mini Banana Bread with Chocolate Chips
Leave a comment