
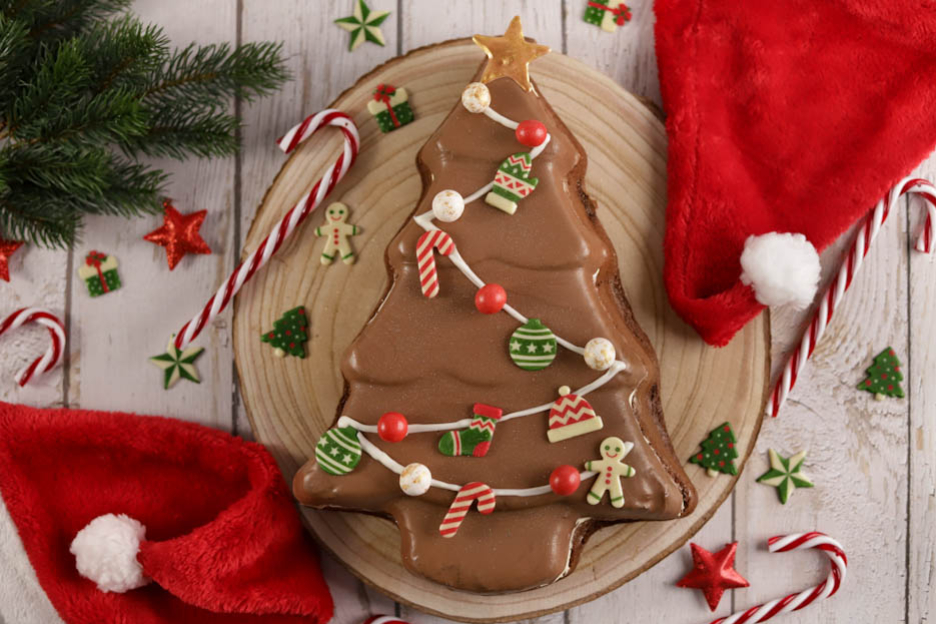
Christmas Tree Cake
Hello food lovers,
Ready for the holiday season?
Inspired by the delicious Kinder Délice, this Christmas tree-shaped chocolate cake will delight everyone. A guaranteed trip down memory lane!
This dessert consists of a chocolate sponge cake, coated with a glaze and filled with vanilla mascarpone whipped cream. All decorated with a magnificent chocolate garland. If you have children, they will surely love to help with the decoration! :-)
Let's get started with the recipe!

To make this cake for approximately 10 people, you will need:
- 6 eggs
- 150gr sugar
- 120gr flour
- 30gr cocoa powder
- 150gr milk chocolate
Vanilla mascarpone whipped cream
- 225gr heavy cream
- 100gr mascarpone
- 50gr icing sugar
- 1,5 tsp vanilla flavouring
- 250gr milk chocolate
- 70gr cocoa butter
- 35gr rapeseed oil
- White chocolate flavour pen
- White and gold crispy choco balls
- Red crispy choco balls
- Christmas figure chocolate decorations
- Gold glitter
- Gold glitter spray
We will start with the chocolate sponge cake as it will need to cool before being filled.
Chocolate sponge cake
In a large bowl, crack 6 whole eggs and add 150gr of sugar.
Whisk everything at maximum speed for approximately 10 minutes.


Meanwhile, weigh 120gr of flour and 30gr of cocoa powder into a sieve and set aside.
Preheat your oven to 180°C, fan-assisted.


Once the egg/sugar mixture is nice and fluffy, sift in the flour and cocoa powder.
It is essential to sift these two ingredients in order to obtain a beautiful lump-free sponge cake.
Gently fold with a spatula so as not to deflate the mixture, until you obtain a smooth and homogeneous batter.


There we go, we have a beautiful sponge batter!
For this recipe, we chose the "Christmas tree" cake mould, perfect for adding a festive touch. :-)
Spray it with release spray to ensure a perfect result once the sponge is baked.
Pour the batter into the mould and bake for 25 minutes in the middle of the preheated oven.


After 25 minutes of baking, we have a beautiful sponge cake.
Do not open the oven before 25 minutes of baking as the sponge may collapse.
To check if it is done, insert the tip of a knife into the centre of the sponge.
If the blade comes out clean, it is done. If sponge sticks to the blade, extend the baking time by 3 to 5 minutes.
Once the Christmas tree cake is baked, turn it out onto a perforated tray lined with baking paper and carefully remove the mould.
Allow the sponge to cool for at least 2 hours before filling.
The sponge can be made 2 days in advance. Once cooled, wrap it well in cling film.
It can also be prepared ahead of time and frozen for up to 2 months when well wrapped.


Once completely cooled, cut the sponge in half.
Start by turning the sponge over, with the Christmas tree pattern facing down on the work surface.
Use a large leveller set to 2 cm to ensure even layers.


Place the top part on a perforated tray lined with baking paper and put it in the freezer for approximately 30 minutes.
Place the bottom part on a serving board or a nice plate.


We will now create a thin layer of chocolate that will give the cake a nice crunch. :-)
Chocolate crunch layer
It's super easy, just melt 150gr of milk chocolate in the microwave for 1 minute at 600Watt.
Mix well until completely melted. If not fully melted, return the chocolate to the microwave for a few seconds.
Pour all of the melted chocolate onto the base of the Christmas tree.


Using a small offset spatula, spread the melted chocolate evenly over the surface of the cake.
Place in the fridge for 10 minutes to allow the chocolate to set.


Now, let's move on to preparing the mascarpone whipped cream to fill the cake.
Vanilla mascarpone whipped cream
In a large bowl, pour 225gr of heavy cream, 100gr of mascarpone and 50gr of icing sugar.


Add 1,5 tsp of vanilla flavouring and whip everything into a firm whipped cream.


Cover the cake with the whipped cream. Use a small offset spatula to spread the cream evenly.
Then place everything in the fridge while you prepare the glaze.


For an ultra indulgent cake, we are going to prepare a chocolate glaze. :-P
Chocolate glaze
Start by melting 250gr of milk chocolate and 70gr of cocoa butter in the microwave at 600Watt for 1 minute.
Mix well then return everything to the microwave for 30 seconds. Repeat until everything is completely melted.


Once the chocolate/cocoa butter mixture is completely melted, add 35gr of rapeseed oil and mix.
Transfer everything into a jug.


Take the Christmas tree part out of the freezer and place it on a wire rack.
Don't forget to place the wire rack over a tray to catch the glaze that drips off.
Pour the glaze over the Christmas tree, making sure to spread it evenly all over.
Place the Christmas tree in the freezer for 10 minutes to set the glaze.
After 10 minutes, place the glazed part on top of the whipped cream-filled base.
If you wish to reuse the glaze for a future recipe, you can. Simply transfer it into an airtight container. :-) The glaze keeps for approximately 2 weeks at room temperature.


Now let's move on to the decoration! :-) Let your imagination run wild to create a magnificent garland to beautify your Christmas tree.
Decorations
Create the garland using a white chocolate flavour pen. To do so, place the pen in a jug of hot water to make it ready to use.


Draw a pretty garland on the Christmas tree.
We chose to decorate it with white and gold crispy choco balls, red crispy choco balls and Christmas figure chocolate decorations.
Place the various decorations on the garland. Be creative! :-)
Browse our "Christmas dessert decorations" category. You will find many decorations to embellish your garland.
If you need to transport your cake, I recommend fixing the decorations with the chocolate pen for extra security.


To finish, add a festive touch to your cake by spraying it with gold glitter.
Keep the cake in the fridge.


A Christmas tree without a star isn't really a Christmas tree. ;-)
Draw a star using the STAR STENCIL.
To do so, place a sheet of guitar paper on the stencil and draw the star using a white chocolate flavour pen.
If necessary, dip the pen in hot water again to make it usable again.
Once the star is drawn, let it set for 5 minutes at room temperature.


Finish by adding gold glitter.
Apply the glitter using a blush brush. Don't hesitate to be generous, it's Christmas after all! ;-)


Attach the star to the top of the Christmas tree using the chocolate pen.


And there you have a beautiful and delicious Christmas tree cake!
This dessert will keep for 2 days in the fridge, well wrapped.
I hope you enjoy this recipe.
Wishing you all a wonderful holiday season! :-)
Sophie
P.S.: All the equipment used can be found at the bottom of the recipe.


Related posts
 Juicy Matcha Muffins with Pecan Nuts & White Chocolate
Matcha Iced Latte & Coconut Variant
Pull-apart bread with fresh wild garlic pesto
Mini Banana Bread with Chocolate Chips
Juicy Matcha Muffins with Pecan Nuts & White Chocolate
Matcha Iced Latte & Coconut Variant
Pull-apart bread with fresh wild garlic pesto
Mini Banana Bread with Chocolate Chips
Leave a comment