
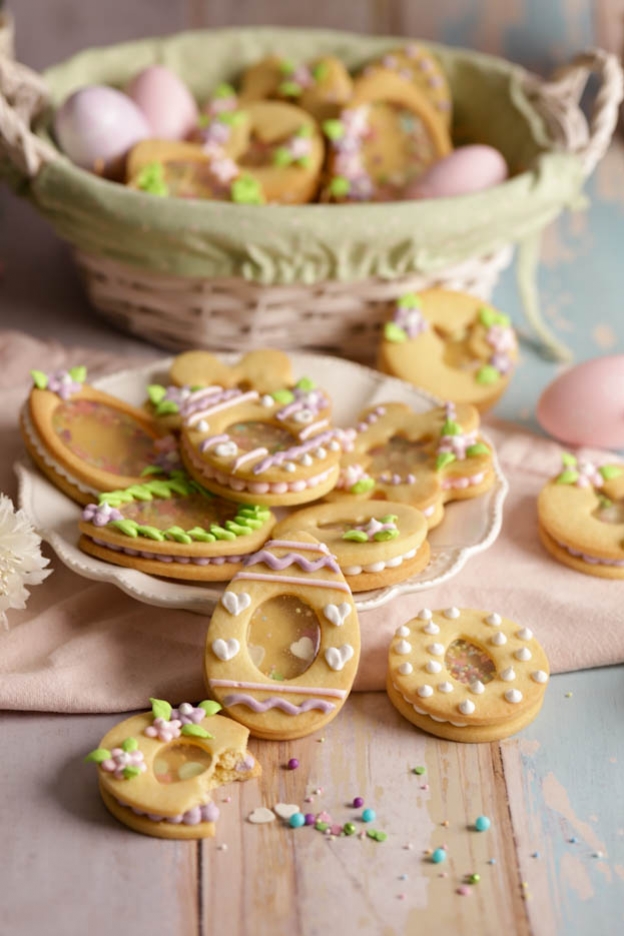
Spring cookies
Hi foodies!
Today, I'd like to show you something original that you can put in your Easter nest.
Here are some very fun cookies that are a big hit with children. :o)
We're going to work here with isomalt (sugar designed for creating decorations) to create a sort of window on the cookies. They will then be filled with pretty sugars, sprinkles... then closed and decorated with royal icing.
I won't lie to you, decorating these Easter cookies takes time, but they are worth it! They are super cute and it's so fun to shake the sprinkles around inside the cookie! :o)

To make about 20-22 cookies, you will need:
Cookie dough
- 250gr of softened butter
- 150gr of icing sugar
- 1 egg
- 1 tsp of vanilla flavouring
- 450gr of flour
- 1/2 tsp of salt
Isomalt decoration
- 1 packet of isomalt (250gr)
Final decoration
- 1 packet of royal icing (450gr)
- Gel food colouring
- Piping bags
- Round tip N°3 of 2 mm
- Leaf tip N°352
- Sprinkles
- Pastel nonpareils
Cookie dough
Start by pouring 250gr of softened butter into your bowl with 150gr of icing sugar and mix with the K beater.
It is essential to use icing sugar so that your cookies are as smooth as possible. No granulated sugar!


You will get a creamy texture. Perfect!
Then add 1 egg and 1 tsp of vanilla flavouring and mix again.
For this recipe, I chose vanilla flavouring, but sometimes I grate lime or orange zest. Cinnamon flavouring and cappuccino flavouring work very well too. :o)


Add 450gr of flour and 1/2 tsp of salt then mix at minimum speed.
Mix for 1 minute maximum!


Finish mixing by hand! If you continue with the mixer, the gluten will develop too much and you will get bubbles on the top of your cookies during baking.


Once a ball is formed, place it on a sheet of baking paper.
Then place a second sheet of baking paper on top so that the rolling pin doesn't stick to the dough.
Roll out the dough using 3 mm cookie spacers and make sure the dough is the same thickness throughout.
Then place it in the freezer for 5 to 10 minutes.
This way, the dough will be much easier to cut. :o)


Once the dough is well chilled, preheat your oven to 160°C, fan-assisted.
I opted for different cookie cutters (flower set, oval set, Mix & Match, egg and bunny set).


For each cookie, we will need a full cookie for the bottom and a cookie with the centre cut out for the top.
With this recipe, I was able to make about 45 cookies in total, approximately 20 full ones and 20 with the centre cut out. I filled 5 trays in total.
The quantity may vary depending on the size of the cookies.
Cut out the cookies and place them on a perforated tray lined with a perforated mat. This way, the cookies will be baked optimally!


Once the cookies are cut out, bake them for 10 to 12 minutes at 160°C, fan-assisted.
I recommend placing only two trays at a time per bake for optimal results.
After baking, let the cookies cool on a cooling rack.


Isomalt decoration
The "window" of the cookies is made with isomalt.
Isomalt is a sugar designed to create decorations and is much easier to work with than granulated sugar because it only colours (browns) at very high temperatures.
Preparing isomalt can be tricky. It is certainly more resistant to humidity than other sugars, but if prepared incorrectly, it can absorb moisture more quickly and become cloudy.
For each brand of isomalt you buy, follow the instructions on the packaging carefully. Here, I used isomalt from Scrapcooking.
For this brand, pour the entire packet (250gr) and 50gr of water into a saucepan.


Then melt the isomalt over low heat until it reaches 150-160°C, checking the temperature with a thermometer.


While the isomalt is melting, place the cookies with the centre cut out on a sheet of baking paper.
Gently stir the isomalt so that most of the bubbles rise to the surface.
Then carefully pour the hot melted isomalt into the centre of the cookies. Let them harden for at least 10 minutes before moving them.
The isomalt is very very hot, be careful not to burn yourself!


And there you go, we have created beautiful "windows".
You could also colour the isomalt with gel food colouring and leave the cookies as they are, it's also very pretty ;o)


Final decoration
All that's left to do is assemble and decorate the cookies.
For this, I used royal icing. Pour the entire packet (450gr) and 50gr of water into the mixer bowl.


Since the royal icing will be piped in 3D, it needs to be firm, unlike other cookies decorated with royal icing.
Mix everything with the whisk for 1 to 2 minutes until you get a firm mass.
Then separate the royal icing into 4 portions.


Keep 1 bowl white and colour the other 3 with gel food colouring in pastel pink, lilac and lime green.
Use only a very small amount of colouring to achieve pastel colours.
 .
.

So that the tips can be swapped between bags, I recommend using a coupler on each piping bag.
Simply insert the large part of the coupler into the piping bag. Cut the end with a knife, place a tip (here, I only used a leaf tip and a 2 mm round tip) and screw the last piece onto the tip. Super simple and practical!


Pour the royal icing into the 4 small piping bags. Push the mass towards the tip using a scraper and close the bags with an elastic band.
When the 4 piping bags are filled, immediately cover them with a damp cloth to prevent the icing from drying out and blocking the tip of your nozzles.


Finally, assemble the cookies.
To do this, pipe dots onto the cookie using the 2 mm round tip. The dots need to have a certain height (about 1 cm) so that the sprinkles can move around inside the cookie once it is closed.


Pour a mix of sprinkles and nonpareils into the centre of your cookie and close it with the window cookie.
The sprinkle mix I chose had 2-3 large sugar pearls that were far too big to close the cookie, so I had to remove them.
Be careful not to move the cookie too much, otherwise the sprinkles will stick to the still-wet royal icing and the fun effect will be lost. You will need to let the cookies dry for a few hours before you can shake the sprinkles around.


Instead of piping dots, you can also simply pipe a ribbon around the cookie, it's quicker, but I find that the dots give a prettier result. ;o)
It's up to you to decide what suits you best.


As the cookies still look a little bare to my taste, I decorated the tops. :o)
With the 2 mm round tip, pipe 5 small dots in purple or pink, then a larger one in white in the centre. The dot gets bigger if you press on the piping bag for longer.
Add two small leaves with the leaf tip N°352 and you have a pretty flower!


With the same round tip, you can also create teardrop-shaped flowers. In the 3rd photo, you can see the two different flowers.
I'll add a video below to show you how to make them.


For the egg-shaped cookie, I made stripes, waves and hearts with the same round tip.
On another cookie, I simply piped small dots. ;o)
There are no limits to creativity and there are no right or wrong ways to decorate them.


Here is a video to show you the different piping techniques I used.
And there you have it! The cookies are finished and they will look wonderful decorating your Easter table! :o)
They keep for at least 2 weeks in a box, away from moisture.
Note that the isomalt remains quite hard. Don't break a tooth. :o)
I hope you enjoyed this tutorial and I wish you a lovely Sunday!
Jenny
P.S.: All the materials used can be found at the bottom of the recipe.


Related posts
 Juicy Matcha Muffins with Pecan Nuts & White Chocolate
Matcha Iced Latte & Coconut Variant
Pull-apart bread with fresh wild garlic pesto
Mini Banana Bread with Chocolate Chips
Juicy Matcha Muffins with Pecan Nuts & White Chocolate
Matcha Iced Latte & Coconut Variant
Pull-apart bread with fresh wild garlic pesto
Mini Banana Bread with Chocolate Chips
Leave a comment