
Rudolph
Sponge Cake Recipe
Chocolate Antlers
Hello foodies!
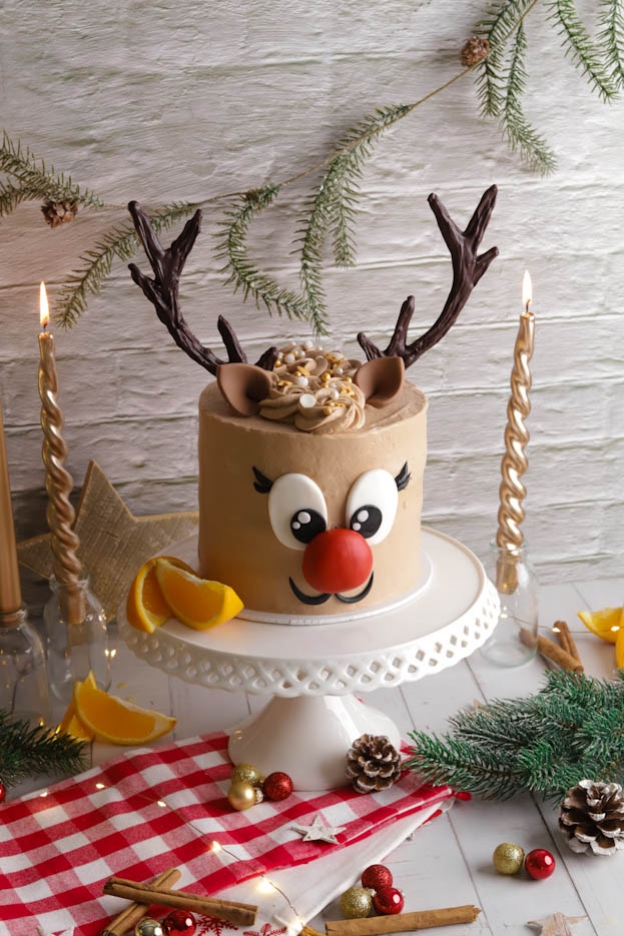
This morning, I'm sharing a Rudolph-shaped cake! :o) Santa's little reindeer will be perfect as a Christmas dessert.
Here is my Rudolph! Cinnamon sponge cake, orange curd, fresh oranges and milk chocolate orange ganache.

For this cake, you need to make a 15 cm sponge cake.
I'm adding the link to my sponge cake recipe here: SPONGE CAKE RECIPE
I simply added 4 tsp of ground cinnamon at the same time as my vanilla flavouring.
This will give it a more wintery taste. :o)
Let your sponge cake cool completely at room temperature. You can prepare it a day in advance by wrapping it in cling film.


Personally, I split my work over two days. On the first day, I made the sponge cake, the curd and the ganache. On the second day, I assembled my cake and made the chocolate antlers. :o) I find it more enjoyable this way and less stressful.
Here are the ingredients for our various preparations:
Milk chocolate ganache
- 6 gelatine leaves
- 150g milk chocolate
- 280g full cream
- 100g orange juice
- 200g full cream
Orange curd
- 3 egg yolks
- 80g sugar
- 20g cornstarch
- 250g orange juice or freshly squeezed oranges
- 40g butter
- 2 oranges
Chocolate antlers
- 80g dark chocolate
Decoration
- White, black, red and brown fondant
- Edible glue
- Glitter
Milk chocolate ganache
Start by making your milk chocolate and orange ganache.
To do so, place 6 gelatine leaves in cold water.
Then pour 150g of milk chocolate into a glass bowl and melt it in the microwave for 1 minute at 600W.


The chocolate will have partially melted. Stir it gently and set aside as is.
Then heat 280g of full cream in a saucepan. When the cream starts to simmer, remove it from the heat.


Add the softened gelatine to the cream, then mix everything well with a spatula until it melts evenly.
Pour your cream/gelatine over your chocolate in 3 additions.


Stir gently with a whisk each time you add cream.
This way, you will get a shiny and smooth ganache.


Finally add 100g of orange juice and 200g of cold full cream.
Stir again gently with a whisk, then cover the ganache with cling film pressed directly onto the surface (touching the ganache).
You can of course squeeze fresh oranges if you wish. :o) Personally, I couldn't be bothered.
Let your ganache rest for a minimum of 3h in the fridge or overnight.


Orange curd
Let's get started on the orange curd! :o)
To do so, pour 3 egg yolks and 80g of sugar into a bowl and whisk the mixture until pale.
Add 20g of cornstarch and mix again.


Add 250g of orange juice and mix again.
Then pour the mixture into a saucepan and heat over medium heat until 70-75°C.


The mixture will first foam a little, then thicken and the foam will disappear.
Always keep whisking without stopping. No need to go crazy. Gently works too, but you must always keep stirring. :o)


Immediately remove the saucepan from the heat and continue stirring for another good minute.
Then add 40g of cold butter and stir until completely melted.
Pour the curd into a glass bowl, press cling film directly onto the surface and refrigerate the curd. :o)


In this cake, I also added small cubes of orange supremes to add fresh fruit and moisture.
Take 2 nice oranges, cut the supremes (orange segments without the skin), then cut small orange cubes. (I didn't take a photo of the small cubes but 1 cm max will be perfect). Set aside.


Chocolate antlers
We still need to make the antler decorations. :o)
For this, I'll let you print the template here: REINDEER ANTLERS
You will also need a guitar sheet (transparent plastic) and a chocolate piping cone.
Melt 60g of dark chocolate in the microwave for 1 minute at 600W.


Once the chocolate is completely melted and has reached 45°C, add 20g of unmelted chocolate and stir gently for 1 to 2 minutes until the chocolate pistoles melt. Use a thermometer to help.
You have just tempered chocolate! :o)


Pour the melted chocolate into your piping cone. The Funcakes ones are great for working with chocolate. No dripping! And they are super simple to use.
Place the guitar sheet over your template and follow the lines. :o)
I fill in stages... So I always start with the outline, then fill in, continue the outline and fill again.


Once the antlers are completely covered, go over the chocolate several times to thicken it and give it a woody effect.
It is very important to go over the chocolate multiple times so that your antlers are thick enough. If they are too thin, they will break when placed on the cake.
Once the antlers are done, place them in the fridge or freezer for about 10-20 minutes.


Time to assemble! :o)
Start by cutting your sponge cake into 3 using a cake leveller.
The cake leveller will allow you to cut your sponge cake as straight as possible. It is super simple to use! Just think of it as a saw and make back-and-forth motions while moving your leveller.
I cut my sponge cake from the bottom, cutting slices of approximately 2-3 cm.


As for the top which isn't perfectly flat (grid marks), I removed it (and ate it hehe).
So I cut my sponge cake 3 times with the same measurement on the leveller.
This gives us 3 even pieces of sponge cake.


You now have 3 pieces of sponge cake, one of which has the crust. This will be the top of our cake.
Place the crust at the very top of your cake. This way, you will avoid small crumbs getting into the ganache. :o)


Take your ganache out of the fridge and place it in a bowl. It's completely normal if it has set firm. :o)
Whip it at medium speed. Definitely not too fast! It could split and would be less airy.
The ganache will whip up and become smooth. When you get a peak (3rd photo) your ganache is ready.


Then place a small portion of the ganache into a large piping bag. One third will be more than enough.
Here I used nozzle N°21 but any nozzle will do... The 12, the 32... it doesn't really matter. :o)
Put a small dollop of ganache on your cake board so the cake doesn't slide around on it afterwards.


Fix the first sponge cake layer onto the board.
To achieve a nice coating and smooth finish, you need a turntable. It's essential! Place your cake on the turntable. Everything will be much easier with it. :o)
Pipe a dam around the top edge of the sponge cake to create a barrier for the curd.
Add 2 generous spoonfuls of orange curd in the centre of the cake. I just whisked the curd for a few seconds to bring it back to a smooth consistency.


Spread the curd using an offset spatula.
There should be curd covering the entire centre of the cake. Be generous! Don't hesitate to add more curd if you think there isn't enough.
Then add pieces of orange supremes. :o)


Add another sponge cake layer on top of the first tier, then repeat the process.
Don't forget that the crust must go at the very top of your cake. Place the sponge cake layers as straight as possible in relation to your base.


To coat our sponge cake as easily and quickly as possible, I recommend this icing nozzle.
It allows you to apply a thin layer of ganache all around the cake. It saves you a lot of trouble.
Start from the bottom. Always go all the way around the cake. Then place the nozzle in the middle and go around the cake again.


Continue on the top of the cake, then the middle. :o)
Try not to leave any gaps between the layers.
And here is the result. All that's left is to smooth it.


First, I smooth with an offset spatula so that the ganache adheres well to the cake.
Always stay parallel to the cake. If your cake is rounding out, you are not parallel.
Then I take my cake scraper. This one, you either love it or hate it! :o) Personally, I love it.
Same thing, always stay perfectly parallel to your cake to get a straight smooth finish.
You need to find the right balance between scraping enough, but not too much either. It takes a bit of practice.


Decoration
For the eyes, nose, mouth and ears, I used white, black, red and brown fondant.
If you prefer, you can use marzipan.
To prevent the fondant from sticking to the work surface, dust it with magic powder.
Roll out the white fondant thinly (2 mm thick) with a small rolling pin, much more practical for making small decorations than a large rolling pin.


For the eyes I used a round cutter (5 cm) and two small round nozzles (5 mm and 8 mm).
You can leave the eyes round as they are or shape them into an oval using your fingers.


Then roll out the black fondant and cut three 2.5 cm circles (one for the lashes and two for the pupils). Also cut a 5 cm circle for the mouth.
Cut two half-moons for the lashes and two half-moons for the mouth.


For the nose, take 20g of red fondant, form a ball and flatten it.


For the ears, roll out the brown fondant and cut two 7 cm hearts using a heart cutter.
Cut the edge with a knife and draw a thin line with the edible glue.
Fold the edges to form a nice ear.


Now that we have cut all the elements, we need to assemble them. For this, use edible glue. Be careful not to soak your fondant. The less glue you use, the better.


For the mouth, cut 1/4 of the half-moon and shape a mouth. Do the same with the lashes.
Set the decoration aside until needed.
Do not place them on the cake more than an hour before presenting it. The nose can also be secured with a toothpick.


For the finishing touch, I piped 3 small rosettes with the ganache and the 2D nozzle. I also sprinkled some glitter for a festive touch. ;o)
Watch the video to make beautiful rosettes:
Regarding the antlers, you first need to score the sponge cake with a knife so you can then insert your two antlers, otherwise your chocolate will break.
I strongly recommend placing the antlers at the last minute to avoid breakage. They remain very fragile. And above all, do not travel with the antlers on the cake. Transport them separately.
To prevent the fondant from melting on your cake, I also recommend placing Rudolph's face at the last moment. This way, you won't have any unpleasant surprises. :o)
That's it! I hope you enjoy this tutorial!
It's a fun cake that makes a nice change from Christmas Yule logs.
The cake will be perfect for about ten people.
Happy Sunday foodies!
Karin
P.S.: All the equipment used can be found at the bottom of the recipe.


Related posts
 Juicy Matcha Muffins with Pecan Nuts & White Chocolate
Matcha Iced Latte & Coconut Variant
Pull-apart bread with fresh wild garlic pesto
Mini Banana Bread with Chocolate Chips
Juicy Matcha Muffins with Pecan Nuts & White Chocolate
Matcha Iced Latte & Coconut Variant
Pull-apart bread with fresh wild garlic pesto
Mini Banana Bread with Chocolate Chips
Leave a comment
Comments
Question de Laurence
By: Laurence C. On 2025-01-24Bonjour, si je fais les bois la veille pour prendre un peu d'avance, faudrait-il faire un tempérage du chocolat? Ou pas besoin? J'ai juste la crainte que les bois viennent un peu blanc ou pas très brillant. Merci beaucoup! :-)
Replied by: Karin On 2025-01-24
Question de Elodie
By: Elodie B. On 2024-11-30Bonjour,
Combien de part peut-on faire avec ce gâteau en utilisant le moule à génoise de 15cm ?
Merci et belle journée !
Replied by: Karin On 2024-12-02
Question de Yasmina
By: Yasmina P. On 2024-11-15Bonjour,
D'abord, merci pour toutes ces recettes et astuces.
J'aimerai faire un cake vache pour un anniversaire
J'ai pensé utiliser cette base de recette et ensuite couvrir avec du blanc
Ma question est ; est-ce que ça serait mieux de le faire avec de la pâte à sucre ou alors avec la crème au beurre?
J'ajouterai ensuite les tâches noires, cornes et oreilles avec de la pâte à sucre
Merci d'avance pour la réponse
Belle journée ; )
Replied by: Karin On 2024-11-15
Question de Alexandra
By: Alexandra A. On 2023-01-10Bonjour,
Est-ce que cette recette irait avec le moule à génoise qui fait 20cm ? ou faudrait adapter toute les quantités ?
Merci d'avance pour votre retour :-)
Salutations
Replied by: Karin On 2023-01-10
Question de Christelle
By: Christelle T. On 2023-01-02Bonjour,
Est-ce possible de préparer la ganache, le curd et la génoise le vendredi, de monter le gâteau le samedi et de le conserver au frigo jusqu'au dimande midi ? Merci pour votre réponse ;-)
Replied by: Laura On 2023-01-03
Question de Isabelle
By: Isabelle S. On 2022-12-19Bonjour,
Est-ce que nous pourrions remplacer le jus d'orange en jus de poires et les morceaux d'oranges par des poires ?
Merci !! Belles fêtes !
Replied by: Karin On 2022-12-20
Question de Gwendoline
By: Gwendoline N. On 2022-10-08Bonjour,
Est-il possible de congeler le gâteau après avoir mis la ganache ou va-t-il perdre de la saveur?
Replied by: Karin On 2022-10-10
Réponse
By: Karin On 2021-11-29Vous pouvez utiliser du papier cuisson mais vous n'aurez pas le même résultat. Votre chocolat sera moins brillant.
Le mieux c'est quand même du rhodoïd ou papier guitare.
Je vous souhaite une belle journée
Bonne pâtisserie :)
Question de Jenifer
By: Jenifer G. On 2021-11-28Bonjour,
Par quoi pouvons-nous remplacer le papier guitare (je n'ai pas de rhodoïd non plus ^^') ?
Merci pour la recette, j'ai hâte de la réaliser pour l'anniversaire de mon petit bout ;)
Réponse
By: Karin On 2019-12-18Alors cela n'est pas l'idéal pour les fruit frais qui sont à l'intérieur...
Un jour en avance il n'y a pas de soucis mais deux c'est un peu trop.
Oui oui vous pouvez prendre le curd orange, citron ou fruit de la passion de la Coop. Il est très bon.
Belle journée
Salutations.
Karin