
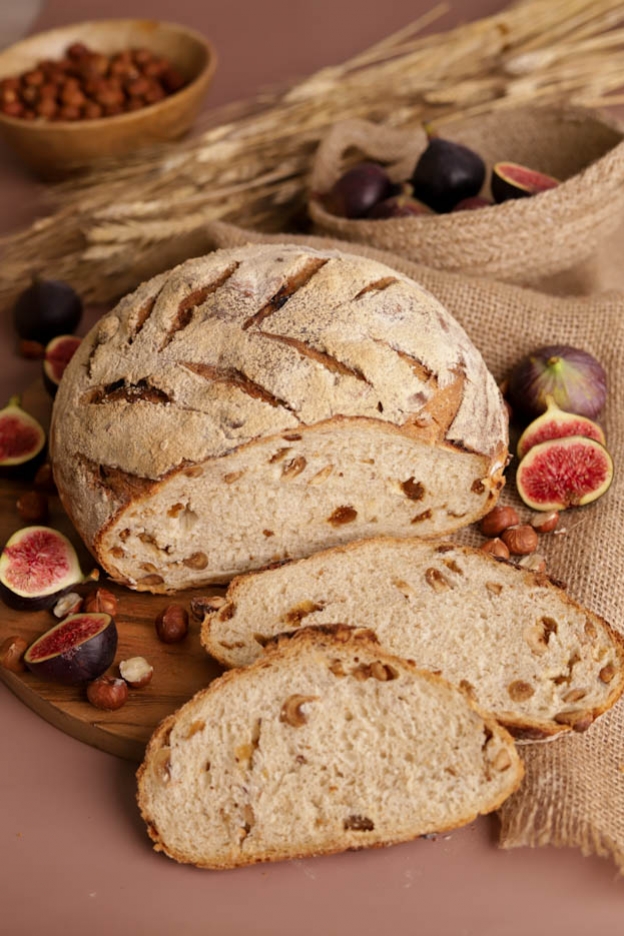
Fig-Hazelnut Bread
Hello food lovers,
I love making my own bread! Nothing beats the smell of fresh bread coming out of the oven and filling my whole house! :-)
For a change from traditional bread, I present my fig and hazelnut bread baked in a Dutch oven that pairs perfectly with a salad, goat cheese or even foie gras ;-)
Baking in a Dutch oven is a method that will allow you to successfully bake your bread every time...whether you're a beginner or an expert!

This recipe can be made in a vegan version by replacing just one ingredient.
To make this bread, you will need the following ingredients:
- 300gr semi-white flour
- 200gr wholemeal flour
- 30gr fresh yeast or 10gr dry yeast
- 300gr lukewarm water
- 20gr honey (agave syrup)
- 1.5 tsp salt
- 70gr dried figs
- 70gr whole hazelnuts
Let's get started with the recipe!
We'll start by toasting the hazelnuts to bring out their flavour.
Preheat your oven to 180°C fan.
On a perforated baking tray, place a perforated mat and pour 70gr of whole hazelnuts onto it.
Bake them for 10 minutes in the middle of the preheated oven.
Once the hazelnuts are toasted, let them cool to room temperature.


While waiting for the hazelnuts to cool, we'll prepare the bread dough.
In a large bowl, pour 300gr of semi-white flour and 200gr of wholemeal flour.


Then crumble 30gr of fresh yeast (or add 10gr of dry yeast) over the flour and pour in 300gr of lukewarm water.
It is very important that the water is lukewarm, between 35°C and 40°C no more...otherwise the yeast will lose all its effect.


Add 20gr of honey (agave syrup) and using the dough hook of your stand mixer, start kneading at speed 1 for 5 minutes.
After the first 5 minutes, the dough starts to come together, so add 1.5 tsp of salt.
It is important to add the salt at this point, because if you add it right at the beginning of the recipe and it comes into direct contact with the yeast, the yeast will lose all its effect and the bread will not rise properly.
Continue kneading for another 5 minutes at speed 1 then 5 minutes at speed 2.


While the dough is kneading, we'll take care of the figs and hazelnuts.
Take your toasted and cooled hazelnuts and rub them between your hands to remove their skins. It doesn't matter if not all the skin comes off.
You can taste a toasted hazelnut and you'll understand the importance of toasting nuts...the flavours are multiplied tenfold! :-)
Pour the hazelnuts into a small plastic bag and crush them roughly using a large rolling pin.


Cut 70gr of dried figs into small pieces.


Now that our dough has finished kneading, add the hazelnuts and figs to it.


Mix well by hand to evenly distribute all the ingredients throughout the dough.
Shape the dough into a nice ball and place it back in your bowl.
Cover the bowl with a damp cloth and let your dough rise for 1h30 at room temperature.


Once the 1h30 has passed, the dough will have risen nicely.
Lightly flour your work surface and turn the dough out onto it.


Shape a tight, round ball between your hands, always keeping the seam against the work surface. The seam is a term used in baking, it is the place where the folds of the dough meet during shaping.


Once a nice ball is formed, transfer it to a bread proofing basket. Make sure to turn your ball upside down, so the seam faces up towards you. The pretty side of the bread should be against the lining of the basket.
The wicker of the proofing basket will ensure good air circulation and thanks to this, the bread will be well aerated during proofing.
Cover everything with a damp cloth and let it rise again for 45 minutes at room temperature.


Once the 45 minutes have passed, the bread will have gained good volume. Perfect! :-)
Prepare a sheet of baking paper and gently turn the proofing basket upside down onto it.
Remove the proofing basket. Note that proofing baskets are not oven-safe, so you must remove it before baking.


Dust a little wholemeal flour over your bread using a small sieve.
To add a nice visual touch, use a bread scoring knife and make a few slashes on your bread.


As you can see in the photos below, I scored it on the sides and then on top. Let your imagination run wild! :-)
Here are some ideas to give your bread a beautiful look:
Now, cut the excess baking paper all around your bread using a pair of scissors.
Gently place your bread in a Dutch oven, making sure to keep the baking paper underneath your bread, then close your Dutch oven.
Since I discovered this Dutch oven baking technique, I always bake my breads this way. I find the bread more airy and crispier. You'll have to let me know! ;-)
Place the Dutch oven in the middle of the oven on a rack, turn your oven to 240°C fan and bake your bread for 45 minutes.


After 45 minutes of baking, remove the lid and put your Dutch oven back in the oven for 15 minutes to brown your bread.
Once your bread is baked, place it on a cooling rack and let it cool to room temperature.
Be careful not to burn yourself, the Dutch oven is extremely hot when it comes out of the oven.
It is really important to let your bread cool completely for two reasons. The first is that warm bread is difficult to digest. The second is that if you slice it too quickly, all the moisture in the bread will escape and it will keep much less well.


Our bread is now ready to enjoy! :-P
I hope you'll enjoy this recipe and give this homemade bread a try.
It will keep well wrapped in a bread box for about 2 days.
Wishing you a wonderful Sunday, food lovers!
Sophie
P.S: All the equipment used can be found at the bottom of the recipe.


Related posts
 Juicy Matcha Muffins with Pecan Nuts & White Chocolate
Matcha Iced Latte & Coconut Variant
Pull-apart bread with fresh wild garlic pesto
Mini Banana Bread with Chocolate Chips
Juicy Matcha Muffins with Pecan Nuts & White Chocolate
Matcha Iced Latte & Coconut Variant
Pull-apart bread with fresh wild garlic pesto
Mini Banana Bread with Chocolate Chips
Leave a comment
Comments
Question de Alexandra
By: Alexandra A. On 2024-03-27Bonjour,
Pour avoir un pain « au lard », peut-on garder votre recette jusqu’à l’eau tiède et rajouter des lardons ?
Merci pour votre aide :-)
Replied by: Karin On 2024-03-28
Replied by: Alexandra A. On 2024-03-28
Question de Géraldine
By: Géraldine V. On 2023-08-25Pain excellent à refaire…on a tous adoré
Replied by: Laura On 2023-08-28