
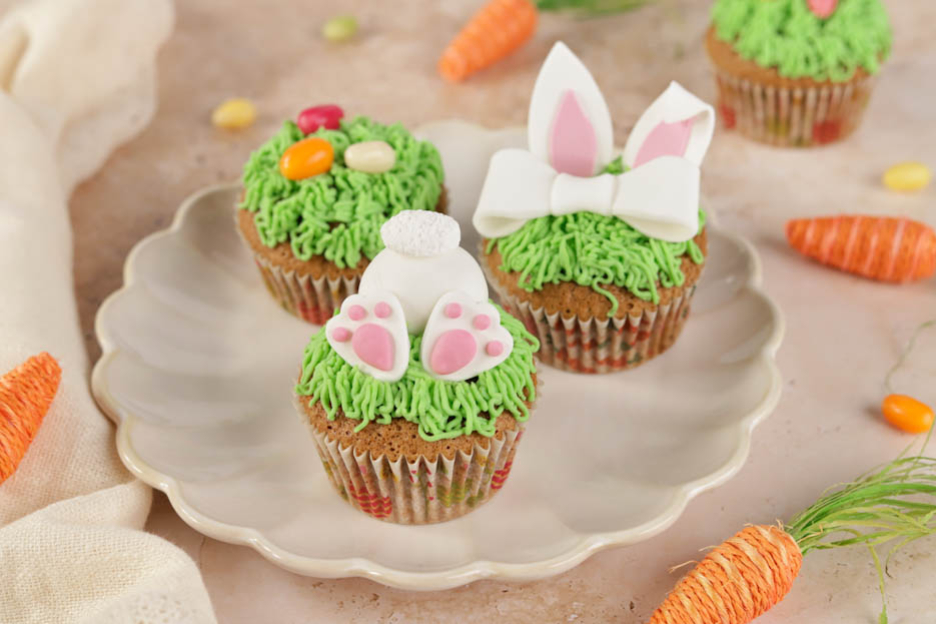
Easter Cupcakes
Hey there, sweet tooths!
Easter is just around the corner and I wanted to share a fun little treat with you! :o)
So here are some carrot cupcakes with lime ganache and a springtime decoration! Kids and adults alike are going to love them!
Spring is here, and with it, the excitement of Easter starting to blossom in our hearts and homes. What better way to celebrate this joyful season than by creating colourful and delicious Easter cupcakes? At Cakelicious, we believe that every moment of sharing is precious, which is why we're bringing you this easy Easter cupcake recipe to brighten up your festive table. These little treats, perfect for Easter, are not only a feast for the eyes but also for the taste buds.
Whether you're an experienced baker or a beginner in the art of baking, our special Easter cupcakes are designed to turn out perfectly every time, adding a touch of whimsy to your celebration. To help you on this culinary adventure, discover our selection of Easter cupcake cases, specially chosen for their quality and their ability to transform your cupcakes into true springtime works of art.
And because at Cakelicious we love sparking your creativity, explore our Easter dessert decorations, where you'll find everything you need to personalise your cupcakes. From colourful sweets to edible decorations, every element has been selected to bring your Easter cupcake ideas to life. Ready to impress your guests and create unforgettable memories? Follow us on this delicious adventure where tradition and innovation come together to celebrate Easter with joy and originality.

Here is the list of ingredients for 14 cupcakes:
- 2.5 gelatine leaves
- 150gr full-fat cream
- 40gr lime juice
- Light green food colouring
- 100gr white couverture chocolate
- 190gr full-fat cream
- 350gr whole unpeeled carrots (about 5 carrots)
- 200gr flour
- 4gr salt
- 1gr baking powder
- 3.5gr bicarbonate of soda
- 1 egg
- 100gr rapeseed oil
- 2 tbsp ground cinnamon
- 230gr brown sugar
White modelling paste
Easter sugar decorations
Lime ganache
We'll start by preparing the whipped ganache, as it needs time in the fridge (minimum 4h).
Begin by softening 2.5 gelatine leaves in very cold water.


In a saucepan, pour 150gr of full-fat cream with 40gr of lime juice (2 limes).
Then add a touch of light green food colouring, ideal for achieving the colour of grass.


Mix lightly with a whisk to check the colour. Keep in mind that the colour will lighten slightly once we've whipped the ganache.
Then bring the cream/lime mixture to the boil.
Squeeze out the gelatine, then add it to the hot cream. Allow the gelatine to melt for 1 to 2 minutes.


In a glass bowl, pour 100gr of white couverture chocolate.
Then pour the cream in 3 additions over the chocolate. This is very, very important! If you pour the cream all at once, your ganache won't emulsify properly and it may split (become grainy).
Gently mix the chocolate and cream with a whisk, gradually adding the cream to achieve a perfect emulsion.


Once the ganache is well combined, add 190gr of cold full-fat cream.
Mix again gently with the whisk.
And there you have it, the ganache is ready... well, almost. It needs to rest in the fridge for at least 4 hours. You can easily prepare it the day before if you wish. :o)
Cover it with cling film touching the surface and store it in the fridge.


Now let's get started on the carrot cupcakes.
Carrot cupcakes
Start by peeling 350gr of carrots, trim the ends and grate them. This will give you about 250gr of grated carrots. That's what we need. Place the grated carrots in a bowl.


Add 200gr of flour, 4gr of salt and 1gr of baking powder.


Also add 3.5gr of bicarbonate of soda, 1 egg, 100gr of rapeseed oil and 2 tbsp of ground cinnamon.


For this recipe I use brown sugar, it tastes so much better! But it also works with white sugar. Add 230gr.
Once all the ingredients are in the bowl, mix everything with a whisk for 10 minutes. The texture will gradually become more liquid and the gluten will develop nicely. The cupcakes will rise much better if you mix for long enough.
Preheat your oven to 160°C fan-assisted.


After 10 minutes, the cupcake batter is ready!
Get your cupcake cases and a cupcake tin.
It is very important to use a tin in addition to the cupcake cases. This way, the cupcakes will stay nicely round and won't lose their shape.
Also, the cupcakes will bake perfectly with this tin. The centre of the cupcake will stay beautifully soft.
Place the cupcake cases in the cupcake tin. One case per slot is enough. :o)


Pour the batter into a piping bag. I used a jug to keep both hands free. :o)
Using the piping bag, fill the cupcake cases three-quarters full. (Cut the tip of the piping bag first. Don't cut too much, otherwise the batter will flow too quickly).
I find that with a piping bag, it's much easier to be tidy and not make a mess. Plus, it's super quick once you've got the hang of it.
Once filled to 3/4 (no more), bake the cupcakes for 25-30 minutes at 160°C fan-assisted.
Tadaaam! The cupcakes should be golden and nicely domed. Let them cool completely before removing them from the tin.


Once the cupcakes are completely cooled, let's move on!
As I said, I wanted to make fun cupcakes! :o)
So I decided to fill my cupcakes with little sugar eggs. Filling them couldn't be simpler!
Take a round piping tip of 12 mm and twist it into the centre of your cupcake to make a nice hole.
Then push the cupcake plug out of your piping tip. Here, I used a rounded modelling tool so as not to damage it.
Cut off the bottom 2/3 of the cupcake plug and carefully keep the top part.


Then place a few sugar eggs in the hole of the cupcake, and seal the top with the remaining plug.
Surprise guaranteed! :o)


Once the ganache has rested for 4h in the fridge, place it in a large bowl. Now whip it for a few minutes to obtain a whipped ganache.
Be careful not to over-whip it! We want a ganache that is well set but perfectly smooth! No split ganache!
And don't worry if your ganache is very firm before whipping, that's normal. :o) It's the gelatine doing its job, but once you whip it the ganache will return to a perfect texture.


Decoration
Time to decorate the cupcakes!
Place the ganache in a piping bag fitted with tip N°233.
Here's the result: cupcakes covered in grass. I'm including the video below so you can see the piping technique. What's very important is to pipe while touching the cupcake before pulling up to get the grass effect.
Start piping from the outside and finish in the centre.


Shall we finish off the decoration?
Here I used the Easter sugar decorations to save time, along with white modelling paste.
This way, the rabbit ears, tail and feet are already ready. We just need to make the bottoms and the bows.
Make sure to use modelling paste and not sugar paste. Modelling paste is much easier to work with for small shapes and decorations.
Cut 30gr of modelling paste.
Make a nice smooth ball with no folds or marks, then cut it in half. This way you'll get two little bunny bottoms. :o)


Place the bunny bottoms on the ganache and get your sugar decorations and edible glue ready.


Place a tiny dot of glue on top of the little bottoms to stick the bunny tail.
Finish by placing the feet and here's the result!


I'd like to suggest a second decoration option.
For this, you'll need the rabbit ears from the Easter decorations pack, a small rolling pin and a bow cutter.
Start by rolling out the modelling paste to the pink thickness (the thinnest setting).
Place the cutter on the modelling paste and press down firmly all over so that the cut is clean. If your paste isn't thin enough, your bow won't cut out cleanly and small bits may remain around the edges… So roll it out nice and thin. :o)


Once the bow is cut out, separate the pieces and keep only the two parts (see photo N°1 below).
We won't use the rest, as we want the bow without the ribbons.
Take the large piece and fold both ends in to form two nice loops. Then take the small rectangle and place it vertically.
Place the rectangle over the centre of the loops, then round it with your fingers.


And there you have it! Two lovely rabbit ears and a little bow for an extra touch of elegance.
I also made a 3rd cupcake with little sugar eggs to have three different designs. :o)


And there you have it – beautiful cupcakes for Easter!
I made these cupcakes for my daughter's birthday! :o) She just turned 11, and this year the theme was bunnies and Easter. Safe to say I had a great time!
I hope you enjoy this tutorial! In any case, the girls absolutely loved these little cupcakes with the hidden surprise inside.
Happy Sunday, sweet tooths!
Karin
P.S.: All the materials used can be found at the bottom of the recipe.


What is the difference between a muffin and a cupcake?
You may have already wondered while preparing your Easter treats: what is the real difference between a muffin and a cupcake? The answer lies as much in their texture as in their appearance. A muffin is generally less sweet, with a denser texture and is often filled with fruit or nuts. It is more of a snack or breakfast item than a dessert. The cupcake, on the other hand, is the life of the party: sweeter, with a light and airy batter, it proudly tops itself with a creamy frosting or a delicious ganache. Our Easter cupcakes are part of this tradition of sweetness and festivity, ready to delight the eyes and taste buds of your guests.
What equipment do you need to make cupcakes?
The magic of special Easter cupcakes lies not only in their delicious taste or their festive appearance, but also in the pleasure of making them. To get started with cupcakes, a few essential tools will be needed. First of all, cupcake cases to hold your batter and ensure perfect baking. A cupcake tin is also indispensable for maintaining the ideal shape of your cakes. Don't forget a piping bag and various tips to decorate your cupcakes with precision and creativity. Finally, let your imagination run wild with our Easter dessert decorations, which will add the finishing touch to your creations. With these tools at hand, you're ready to make easy Easter cupcake recipes that are sure to delight everyone around you.
Blog created on 8 March 2019, updated on 21 March 2025.

Related posts
 Juicy Matcha Muffins with Pecan Nuts & White Chocolate
Matcha Iced Latte & Coconut Variant
Pull-apart bread with fresh wild garlic pesto
Mini Banana Bread with Chocolate Chips
Juicy Matcha Muffins with Pecan Nuts & White Chocolate
Matcha Iced Latte & Coconut Variant
Pull-apart bread with fresh wild garlic pesto
Mini Banana Bread with Chocolate Chips
Leave a comment
Comments
Question de Florence
By: Florence H. On 2024-03-17Bonjour, j'ai fait ces cupcakes et ça a bien marché. Très drôle de faire l'herbe. Par contre, vers la fin de la douille, la ganache commence à devenir plus liquide par rapport au début. J'ai déjà eu le cas dans les autres desserts. Je pense que ça vient du fait d'appuyer avec les mains sur le sac. Avez-vous un astuce ? Merci.
Réponse
By: Karin On 2021-03-29Merci pour votre message.
Vous pouvez tout préparer 2 jours avant. Conservez les cupcakes au frigo mais ne mettez pas les décors dessus. Vous pouvez sans autre mettre les décors dans une boîte ;)
Belle journée
Question de Karine
By: Karine M. On 2021-03-28Bonjour,
Je voulais faire cette recette et j'avais une question par rapport à la conservation. Je voulais la faire un peu en avance mais ne sait pas comment les conserver (à l'ai libre ou au frigo?). J'ai peur qu'en les mettant décorés au frigo (avec la ganache, les décos en sucre et la pâte de modelage), que cela ne fonde ou se ramollisse. Est-ce que je peux les laisser à l'air libre sans que cela ne pose problème par rapport à la ganache? Combien de temps est-ce que je peux les faire à l'avance?
Avec mes meilleures salutations.
Karine