
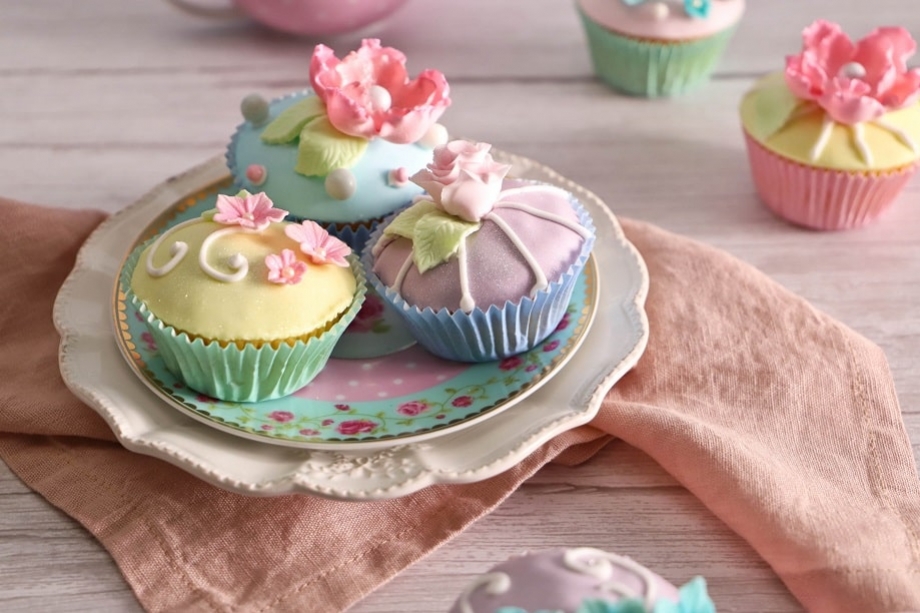
Lemon Cupcakes
Hey there, foodies! :o)
Attention all fondant lovers (and beginners who want to learn, of course)! This week, I'm sharing a recipe for delicious lemon cupcakes covered in fondant.
I'll teach you a few techniques for working with fondant, making pretty flowers, and impressing everyone around you! ;-)

For 12 cupcakes, you will need the following ingredients:
Decorations
- Pastel colour fondant kit
- Rose cutter
- Flower cutters
- "Rose" cutter kit, large or small in different sizes
- Petunia flower kit
- Leaf cutters
- Round cutter
- 110gr royal icing
- 1-2 tbsp water
Lemon curd
- 1 gelatine leaf
- 1 egg
- 50gr sugar
- 5gr cornstarch
- 100gr lemon juice
- 70gr butter
Lemon muffins
- 125gr soft butter
- 100gr sugar
- Zest of one lemon
- 50gr lemon juice
- 2 eggs
- 200gr flour
- 1 tsp baking soda
- 1 tsp baking powder
- 1 pinch of salt
- 100gr whole milk
Fondant decorations
In order to give our sugar flowers nice curves and volume, it's best to start with the decorations so they can dry properly. It's even better to make the flowers 1 to 2 days in advance.
Little tip: When I make sugar flowers, I like to make a lot of them (since all the equipment is already out) and then store them dried in an airtight box. They will keep without any problem for 6 to 12 months away from light.
This way, I always have decorations on hand for our cupcakes or other desserts! ;0)
Let's get started!
I'm going to show you several sugar flower techniques. Then it's up to you to choose the final decoration. :o)
Start by rolling out a piece of fondant (I chose pink) using a small rolling pin (about 3 mm), I used the Funcakes pastel kit here.
To prevent the fondant from sticking to the work surface, dust with magic powder. To dose this powder properly, I recommend the Wilton duster.


1st method:
Using the flower cutters, cut out flowers of different sizes.
These cutters with ejectors are very practical, especially for small flowers – they save a lot of frustration and the technique is very quick.
Here are my tips for these cutters: Cut your fondant with a back-and-forth motion. Then, on the foam mat, press the ejector to form a small hollow in the middle of your flower. Lift your cutter. If the fondant has stayed in the cutter, don't panic! Just push the ejector to release the flower. :)
Foam mats are really great for working with sugar flowers without damaging them.


2nd method:
This Silikomart petunia flower kit is one of my favourite cutters. The kit contains a cutter and a silicone mould (with veins) that gives structure and depth to the flower.
First, cut out a petunia using the cutter.
Take the silicone mould, dust it well with magic powder and lightly tap the mould on the work surface so the flower isn't covered in white marks.


Place the cut petunia in the silicone mould and close it gently.
Careful! Don't press too hard – we don't want to crush the flower, just shape it. ;0)


Also let the petunias dry in bowls.
Tip: You can use all kinds of cutters with this silicone mould, as long as they are smaller than the mould! ;o)


3rd method:
To make a pretty rose, I use the rose cutter. Cut out the fondant and divide it in two using a wheel cutter.
Thin the edges of the petals using a ball modelling tool and a foam mat. This technique gives relief and volume to the rose.
Very important tip: The ball of the tool should be half on the petal and half on the foam mat. If the ball is only on the petal, the flower will thin in the middle but not at the edge. If your ball sticks to the fondant, don't hesitate to dust your fondant with magic powder.


You can see in the photos below that our fondant is very thin on the rounded edges. Perfect!
Turn your strip of fondant the other way and apply a little edible glue along the bottom of the strip.
Then roll the strip up to get a pretty rose.


When rolling the rose, roll it tightly at the beginning and then looser and looser to give it the most natural shape possible.
To get a wider rose, simply add a second strip to your rosebud.
Once your roses are made and dried, carefully trim their base with scissors. This will look neater once the roses are placed on the cupcakes.


4th method:
For the following flowers, I use the "Rose" cutter kit, large or small. Here too, as with the others, roll out the fondant very thinly.
Then cut out a flower using the cutter and thin the edges of the petals to get a nice texture. Always using the ball modelling tool and the foam mat.
Don't forget! Half the ball tool must be on the foam and the other half on the flower.
The more thinly your fondant has been rolled out, the easier it will be to give it volume and texture.


The foam mat set contains two mats of different thicknesses that are softer or firmer. For example, here I use the purple mat to thin my petals and the pink mat to give them a beautiful shape.
As I mentioned above, these mats are great for working with these types of flowers.
So once the petals are thinned, place them on the pink foam and slide the ball tool from the edge of the petal to the middle of the flower to give it volume.
Once your flowers are done, let them dry in bowls so they keep a rounded shape.


When all the flowers are well dried (minimum 1h30 of drying time), you can dust them with pink powder colour. Use a dry brush for this.


You can either leave the flower as it is, or layer a smaller flower on top using edible glue.


For the finishing touch, you can also glue a white pearl in the centre of the flower.


Here you can see the other flowers before and after finishing. I'm always amazed at how realistic the flowers become with a little powder and some pearls.
So there you have 4 different techniques to decorate cupcakes or other desserts. :o)


Discover our tips for creating fondant flowers
Lemon curd
Before starting on the muffins, we are going to prepare the lemon curd so it has time to cool down.
Lemon curd is a kind of cream that is often used for lemon tarts, for example.
It can also be prepared the day before. You will have a little too much, but it is difficult to reduce the quantities for an optimal result. But don't worry, it freezes very well for up to 3 months in an airtight box.
Start by soaking 1 gelatine leaf in cold water.
Then weigh 5gr of cornstarch with a measuring spoon and pour it into a saucepan with one egg.
Then add 50gr of sugar and whisk the mixture until it becomes pale.


Once the mixture is slightly foamy, add 100gr of lemon juice and mix again.


Bring the curd to a boil, stirring constantly over high heat (7 or 8).
You will see that the mixture will foam slightly when heated.
ATTENTION: Never stop stirring, otherwise the egg will cook and it will create lumps.
As soon as the first PLOP appears, immediately remove the saucepan from the heat, but continue to whisk the mixture until there is no more foam.
Then add the squeezed-out gelatine and stir again.


Finally, add 70gr of butter and mix until it is well incorporated.
Then fill a piping bag with lemon curd. To do this, place the piping bag in a jug so you have both hands free to fill it more easily. ;0)
Then store the piping bag in the fridge.
The lemon curd can be used for other desserts or fillings such as lemon tarts, for example.


Lemon muffins
Preheat your oven to 180°C (top/bottom heat).
In a bowl, pour 200gr of flour and add using a measuring spoon, 1 tsp of baking soda, 1 tsp of baking powder and a pinch of salt, then mix everything together with a spoon.


Pour 125gr of soft butter, 100gr of sugar and 50gr of lemon juice into a bowl. Then grate and add the zest of one lemon.
Then whisk everything at maximum speed until you get a pale and fluffy mixture.


Gradually add 2 eggs while continuing to whisk at low speed.
When the eggs are well mixed in, add 100gr of whole milk and the flour/baking soda/salt/baking powder mixture alternately, without stopping mixing, to obtain a smooth batter.


Pour the batter into a piping bag using a scraper and a jug.
As before, place the piping bag in a jug so you have both hands free to fill it more easily. ;0)


Take a cupcake tin and place paper cases in it – here I chose pastel cases. The colour will match my fondant decorations. Then distribute all the muffin batter into the cases filling them 2/3 full.
Bake the muffins for 20-25 minutes in your oven preheated to 180°C (top/bottom heat).


Once baking is done, place the muffins on a rack to cool.


Decoration
To start, we are going to prepare the royal icing.
I love decorating my cupcakes with royal icing because it allows you to create beautiful decorations and it also acts as a glue.
In a bowl, pour 110gr of royal icing and 2 tbsp of water. Mix everything together with a spoon.
The icing should flow in a ribbon (but without being too runny). If that's not the case, add a little more water until you reach the desired consistency. If you're not sure, shake your bowl – if everything becomes smooth then it's ready.
Pour the mixture into a piping bag fitted with an adapter and a 1 mm round tip. Put clips at the top and bottom so the mixture doesn't dry out and place the tip under a damp cloth.


It's time to fill our muffins with lemon curd.
To do this, make a hole in the centre of the cupcake (once cooled) using a 1M tip or a cupcake corer.
Remove the small cake plug and cut the top off the plug. Keep the top of the plug (about 0.5 cm) and eat the rest. :o)


Fill the inside of the muffin with lemon curd and close the hole with your little plug piece. No one will ever know.


Let's get started with the fondant decoration!
As before, roll out a thin layer of fondant (approx. 3-5 mm) and cut out an 8 cm circle using a large round cutter.
To make the fondant stick to the cupcake, make a small swirl of royal icing on your cupcake. Jam, buttercream or ganache would also work. However, other creams are not recommended as they would make the fondant melt due to their moisture.
Once the royal icing is added to the cupcake, simply place your fondant circle on top.


Gently smooth (with your fingers) the fondant over the muffin so that the sponge is no longer visible.
For a more efficient workflow, I recommend filling all the cupcakes with lemon curd first, then covering them all with fondant. This method saves a lot of time.
For the decoration, do whatever you like. Here I'm just showing you a few examples to inspire you.
You can for example draw pretty lines or dots with royal icing. Also stick your flowers on with a dab of royal icing.


Small sugar leaves could also be added for a more realistic look.
As I mentioned earlier, I like to make the flowers a few days in advance. However, for the leaves I find it's better to make them at the last minute so you can adapt their curves to your cupcakes.
As with the flowers, roll out your fondant to 3 to 5 mm and cut out leaves using the leaf cutter (the smallest in the set).


For an even more festive finish, I decided to add glitter to my cupcakes :o) Here I used the silver glitter spray.
Spray your cupcakes keeping a distance of 15-20 cm. If you spray too close, the glitter will clump together. So don't spray too close.


And there you have it, perfect cupcakes for a Tea Time! ;0)
If you don't want to decorate the cupcakes in such an elaborate way, you can simply make the muffin batter, the lemon curd and pipe on a buttercream or ganache. :o)
But with this recipe you'll be able to decorate cupcakes or other desserts with pretty flowers.
Wishing you a lovely Sunday!
Jenny
P.S.: All the materials used can be found at the bottom of the recipe.
Here again all our different decorating fondants.


Related posts
 Juicy Matcha Muffins with Pecan Nuts & White Chocolate
Matcha Iced Latte & Coconut Variant
Pull-apart bread with fresh wild garlic pesto
Mini Banana Bread with Chocolate Chips
Juicy Matcha Muffins with Pecan Nuts & White Chocolate
Matcha Iced Latte & Coconut Variant
Pull-apart bread with fresh wild garlic pesto
Mini Banana Bread with Chocolate Chips
Leave a comment
Comments
Question de Elsa
By: Elsa S. On 2023-12-18Bonjour,
Avez-vous une astuce pour que les cupcakes ne décollent pas des caissettes?
Merci d’avance. Meilleures salutations.
Silva Elsa
Replied by: Laura On 2023-12-18